 KanauKanau
A lighting console for film and television, built for iPhone. Control fixtures over Art-Net, sACN and CRMX, with color, Scenes, effects and diagnostics in your pocket.
What's new ・ Glossary ・ Last updated 2026-11-15 ・ checked on 1.1 build 386
The main changes in each version, newest first. Each chapter has the details.
Lite 1, Back 1 and Vibe 1 when patched, and it has play, pause and restart buttons.The first time Kanau opens, a practice rig of 4 fixtures is already patched. You do not need a single light to try the three steps below. They take about three minutes.
Button names are written exactly as they appear on screen.
GM at the top right of the screen (GM 100 on iPad). In the panel that opens, pull down the GRAND fader at the right end, and everything gets dimmer. The band at the top of the screen and the edge of the screen turn red.BACK TO 100 to bring the brightness back, and close the panel with the × at the top left.A fader moves by the distance your finger travels, not the place you touched. Where you start makes no difference to the result.
Intensity sets brightness; the color picker and the R, G, B bars set color. A fixture with color temperature also shows Color Temperature.The items in the panel depend on what the fixture can do.
Scenes tab at the bottom. It holds four Scenes: DIM, COLOR, PIXELS, FX.Play at the bottom, then PLAY in the list that opens. The bottom row turns into BACK and NEXT, so you can step through the Scenes while you watch Home. EXIT brings the tabs back.With the starting setting (AUTO UPDATE), changing intensity or color after a recall rewrites that Scene. To keep a Scene as it is, see chapter 08.
Even with no lights attached, you can see the DMX values Kanau sends.
OUTPUT OFF at the top left. A Slide to send row opens below it.Settings → DMX Monitor. It shows the numbers Kanau is actually sending.The numbers in DMX Monitor change as soon as you move a fader.
The demo fixtures are patched on U1 from address 1. Do not start sending the demo on a network that reaches real lights.
The demo you get on first launch holds the following.
None of these fixtures is a real product. They are there so you can try the controls and watch the values change in DMX Monitor.
Once the demo makes sense, move to your own gear.
OUTPUT OFF as it is and make a new show with Settings → Shows → New Show. The demo fixtures are patched on U1 from address 1, so sending the demo can reach the lights on site.Patch → + Fixtures → Add New Fixture, then set the model, DMX mode, universe and address. Make them the same as the settings on the fixture itself (chapter 03).Settings → Output, check that Nodes Answering is 1 or more. Gear that does not answer polling stays at 0 while receiving normally. If yours stays at 0, carry on anyway and judge by the light itself.Settings → Output (the universes that will go out). Then tap OUTPUT OFF at the top left of Home and slide the round handle all the way to the right. Once sending starts, Network Output in Settings → Output shows a figure (chapter 02).Scenes to store the look (chapter 08).The practice rig is an ordinary show. Once your own lights are patched, you can delete the demo show.
OUTPUT OFF at the top left and slide the round handle. To stop, tap the same place and slide the handle in Slide to stop. When another console is sending on the same universe, you will see Blocked or SHARED (chapter 02).A fixture with Lock on will not go out when you press B.O., and will not go out when you pull the grand master to zero. Check that your locks are clear before a take. The count of what is still lit during a blackout is shown next to the green 🔒 at the top of the screen.
Where everything is on the Home screen. The meaning of each color and mark is collected here too.
Before the detailed tables, these are the only places you need to know.
| Place | What it does |
|---|---|
| GM | Overall brightness, at the top of the screen |
| Fixtures / Groups | Chooses which fixtures appear |
| Fader | Sets intensity |
| Scenes | Stores looks and brings them back |
| Play | Opens a list: PLAY, which steps through Scenes (iPhone), then COMMAND, ZEN, STAGE and FIXTURE SHEET |
| Patch | Registers fixtures |
| EFFECT | Applies and stops effects |
| Settings | Output, shows, MIDI, session |
Everything below is the detail.
Home is where you work. Tapping a tab at the bottom opens a panel or a list over Home.
Scenes, Patch, Settings: a panel opens over Home.Play on iPhone: a list of PLAY, COMMAND, ZEN, STAGE and FIXTURE SHEET opens. Tapping PLAY in the list opens no panel; it turns the bottom row into the Play row.Play on iPad: it sits in the column on the left. It opens a list of COMMAND, ZEN, STAGE and FIXTURE SHEET. There is no PLAY.To come back to Home, drag the handle at the top of the panel down, or tap × at the top left. A panel opened from inside another one, such as DMX Monitor, has ‹ at the top left instead of ×. Tapping ‹ goes back one panel.
Some things differ by device and situation.
Patch.| Tab | What it is for | See |
|---|---|---|
| Scenes | Saving and recalling looks | Chapter 08 |
| Play | On iPhone, opens the list of PLAY, COMMAND, ZEN, STAGE and FIXTURE SHEET. Tapping PLAY turns the bottom row into EXIT, UPDATE, BACK and NEXT. On iPad the list is COMMAND, ZEN, STAGE and FIXTURE SHEET | Chapters 03, 04, 08 |
| Home | Setting intensity with faders | Chapter 04 |
| Patch | Fixtures, addresses, modes, groups | Chapter 03 |
| Settings | Kanau Free / Kanau Pro, DMX output, shows, MIDI, session, LITE MODE, preferences | Chapters 02, 03, 11–13 |
The left of the status line is the send state. Tap it to open the row that starts and stops sending (chapter 02). Each time Kanau opens it reads OUTPUT OFF, and nothing goes out until you slide.
While sending it reads SENDING and the universes, such as SENDING U1 U2. Where there is no room, it becomes a single letter for the route. Art-Net is A, sACN is S.
The dot next to it pulses while sending, while waiting for the slide, and while LISTENING. Bluetooth has its own dot and name.
Next to them is the name of the show that is open. On a narrow phone, where the row has no room to spare, it is left out.
While BLIND is on, this whole left part becomes an amber BLIND. Tap it to leave BLIND (chapter 08).
| Shown | Meaning |
|---|---|
| OUTPUT OFF | Nothing has been sent since Kanau opened. Tap it to open the Slide to send row below, then slide. If you change the look while nothing is sent, it turns red and reads Not sent, and stays red until you start sending |
| SENDING, tapped | Opens Slide to stop. Slide right to stop sending; the line goes back to OUTPUT OFF. Done closes the row |
| LISTENING | Checking for another sender before sending, for about a second |
| SENDING U1 U2 | Those universes are going out. A gray U3 OFF here is a universe that has fixtures patched but has not been slid to start sending yet. It is not the red U1 OFF further right on the line |
| Blocked U1 | Another sender is already on that universe, so Kanau does not send on it. Tap it for the choices (chapter 02) |
| Green dot | Sending |
| Amber dot | Slowed down, or reconnecting (Reconnecting…) |
| Red dot, ART-NET No node or SACN No node | No node is answering. Tap it to open Settings → Output. While the Play row is showing it does not open, so tap EXIT first. The route's name is shortened on a narrow screen |
| Red dot, ART-NET Blocked or SACN Blocked | Sending has stopped for a reason that will not clear by itself. Tap it to open Settings → Output, which shows the reason and what to do about it in red. The route's name and Blocked are shortened on a narrow screen |
| Gray dot, Idle | Sending has been started but nothing is going out. Shown when every universe is switched off, or when there is no network |
| SHARED and an IP or a device name | Another console is sending to the same universe. This one is still sending too |
| JOINED or WATCH ONLY, and a name | In a session. DMX goes out from the host |
| FREE ×3 (white) | How many fixtures are FREE. Shown now and then in place of the send state (chapter 08) |
| Kanau Free (white) | While on Free, shown for 3 seconds when you start sending and when you come back to Kanau (chapter 03) |
SENDING and a green dot do not prove the light received anything. Chapter 02 explains how to check the connection; chapter 14 covers what to do, symptom by symptom.
The middle and right of the line carry these. GM sits at the right end, after SCREEN LOCK.
| Item | Tap | Hold, or note |
|---|---|---|
| GM 100 | Opens the grand master panel | Hold for its settings. Below 100 it is filled red and pulses |
| B.O. | Clears the blackout. At GM 0 it opens the GM panel instead | Replaces GM while the console is dark. B.O. is also shown when GM is 0 |
| U1 OFF (red) | Nothing | Which universes are switched off, by number. Up to three, then + for more. Turn them back on in Settings → Output |
| 🔒 n (green) | Nothing | What is still lit while the console is dark: locked fixtures, faders set as a switch that are ON (when the grand master is at 0), and locks left at an old address |
| BATTERY SAVE | Turns it on and off | Hold to set the brightness and the fade time. While it is on, it now and then shows the brightness the fixtures keep, such as 50% |
| SCREEN LOCK | Does not lock | Hold for 0.5 seconds to lock the screen |
Notes on the table:
| Item | How to use it |
|---|---|
| Fixtures / Groups | Switches between showing by model and showing by group. On iPad it sits in the status row at the top of Home |
| Fader count | Faders on a page, chosen from the list that opens when you tap it. On iPhone: 10, 8 or 5; five makes each one wider. On iPad: 30, 24, 20, 16, 15 or 8 (40, 24, 20, 16 or 8 on a 13-inch), in the status row |
| HISTORY | Opens the list of earlier states, with UNDO ↓ and REDO ↑ at its head. On iPhone it sits at the right end of the Fixtures / Groups row; on iPad, in the status row just left of GM |
| Model and group buttons | Tap to show those fixtures on Home. Hold to set color and intensity for all of them. What is written on a button is explained below the table |
| CLEAR n | Clears the selection. The light does not change |
| ‹ / › | Moves between pages. While the FREE master is down, this row shows its level, such as FREE ↓0 (chapter 04) |
| Number | Intensity from 0 to 100. Shown large at the top while you drag |
| Round fixture icon (…) | Tap to select. Hold to open that fixture's panel |
| Fader | Drag up and down to set intensity |
| Model name | Marks a run of the same model and mode |
| Number button | The fixture number. In piano mode it changes intensity while held |
| ⏻ | Turns the output off and on, keeping the value |
| COLOR | Sets color and intensity for the selected fixtures |
| EFFECT | Applies an effect to the selected fixtures. With nothing selected, opens the list of running effects |
| PIXELS | Opens and closes the cells of pixel fixtures |
| Play row | On iPhone, shown after you tap Play → PLAY. EXIT brings back the usual buttons (chapter 08) |
| + − | Cycles piano mode: LOCK → + → − |
| FINE | Cycles sensitivity: normal → FINE (1/10) → FINE+ (1/20) |
A model or group button carries the following.
COLOR, EFFECT and PIXELS each have their own condition.
| Color or mark | Meaning |
|---|---|
| Amber | Selected, or active |
| Red | Blackout, a low grand master, a network problem, piano mode. Something to check |
| Green | Sending. Fixture Lock. BATTERY SAVE on |
| Amber band and edge | BLIND is on. What you do does not reach the lights |
| Purple | Output switched off, or the screen locked |
| Cyan | Being worked by the other device in a session |
| Orange | At a limit you set |
| Gray | Unavailable, or stopped |
Tap the round icon to select the fixture; hold it to open the fixture's panel. The icon carries the fixture's color and its real output:
The edge of the screen shows that the output is being held down. The status line shows what is holding it down.
| Edge | Meaning |
|---|---|
| Red, pulsing, with a light traveling around it | The grand master is below 100 |
| Thicker, deeper red, with a faster light | The grand master is at 0, or a blackout |
| Green, with a long light sliding slowly around it | BATTERY SAVE is on |
| Red and green taking turns | Both: red for about six seconds, green for about three |
| Amber frame, joined to the band at the top where the clock is | BLIND is on. A low grand master pulses red on the frame; green is not shown |
Setting up the link to your lighting gear, and checking that DMX is getting there.
 12345
Kanau never starts sending by itself. Each time it opens, output is off and the status line reads OUTPUT OFF; the patch, the destination and the switched-off universes are kept. Moving a fader or recalling a Scene never starts output.
If the light changes while nothing is being sent, the status at the top left turns red and reads OUTPUT OFF / Not sent, and stays red until you start sending. The first time you touch a fader while nothing is being sent, the row above the faders turns red and reads Not sent / Slide OUTPUT to send, and goes back 2 seconds after you lift your finger. That row appears only once while output is off. There is no vibration.
When you slide, Kanau first listens for about a second for another sender. It then sends every patched, switched-on universe that has no other sender on it, continuously. The rate is normally 44 Hz. Bluetooth connects when you slide, not at launch.
To stop sending, tap the status line and slide Slide to stop to the right. It goes back to OUTPUT OFF.
Output also goes back to off, and you have to slide again, when:
A universe added to the patch later stays off until you slide, and the status line shows it, for example, as U3 OFF. Output stops while Kanau is not on screen and starts again when you come back; SCREEN LOCK does not stop it.
Read these in order. Each one tells you something different, and none of them can tell you that the light itself received the data.
| Where | What it tells you |
|---|---|
| The dot on the status line | Kanau is sending, or is about to (chapter 01) |
| Network Output in Settings → Output | How many packets went out over the network in the last second. A figure in packets/s means Kanau is sending; Nothing means it is not |
| Nodes Answering in Settings → Output | Which nodes answered Kanau. Gear that does not answer polling shows 0 while it is receiving |
| Settings → DMX Monitor | The values Kanau is sending, channel by channel |
Art-Net and sACN are exclusive: pick one. CRMX over Bluetooth runs alongside either.
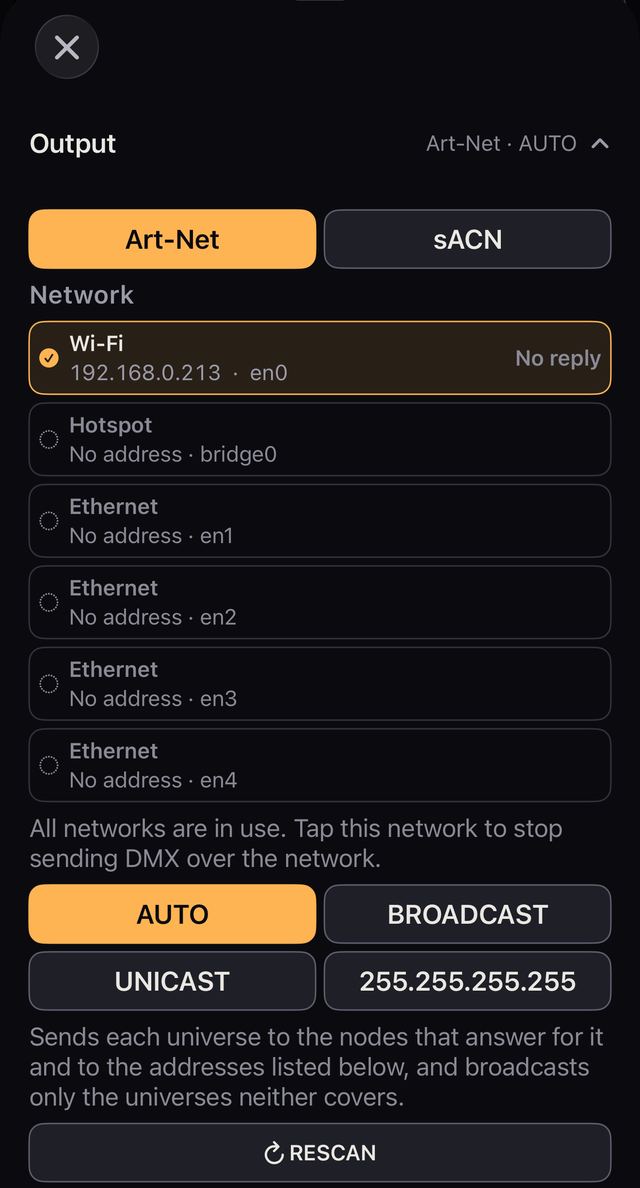
Network lists your Wi-Fi, Ethernet and Hotspot connections with their addresses and how many nodes answered on each.
If you use wired and Wi-Fi together, check that both appear in the list.
| Setting | Where it sends | When to use it |
|---|---|---|
| AUTO (Art-Net) | To the nodes that answered; broadcast when none answers | The normal choice |
| BROADCAST (Art-Net) | Every frame to each network's subnet | When a node reports a wrong address and nothing arrives on AUTO |
| UNICAST | Straight to the addresses you enter | When broadcast does not reach the node, or you want to name the target |
| 255.255.255.255 (Art-Net) | Broadcast on the segment. Does not cross a router | When addressing does not line up and ordinary broadcast fails. iOS may block it |
| MULTICAST (sACN) | The multicast address for each universe | The sACN default |
On AUTO, where each universe goes depends on what the nodes answer.
When a node starts answering for a universe that was being broadcast, from then on that universe goes only to the nodes that answer. An amber notice on Home says so. Gear that does not answer then needs its address typed into the list.
With UNICAST, type the node's address and tap Add. The same list is shown under AUTO, for gear that does not answer polling.
With UNICAST and nothing ticked, a red line says No node IP is switched on or entered. No DMX is going out over the network.
If Nodes Answering is 1 or more on AUTO but a light does not respond, check whether the node is reporting the wrong address for itself. Look at Destination and try BROADCAST. Chapter 14 covers the other causes.
Tapping RESCAN under Art-Net refreshes the node list. Use it after adding gear, removing gear or changing an address. Left alone, a new node appears within about 3 seconds. A removed one disappears after about 10 seconds.
Sending continues while it scans. RESCAN also measures the round trip to each node that answers. RESCAN is unavailable with no usable network.
In Settings → Output, a red line says what stopped the output and what to do about it. It says things such as these.
CRMX carries a line of its own. The console's own wording stays in brackets at the end, so it can be quoted exactly.
Universes lists each patched universe with its fixture count, how many are lit, and an ON/OFF switch. A universe that is OFF reads Not sending, and so does one that has not been slid since it was patched.
OFF stops sending that universe. Nothing goes out for it on Art-Net or sACN, and over Bluetooth the link stays up but nothing is written. A receiver may keep its last values, so a light can stay lit. The top of the screen names the universes that are switched off, such as U1 OFF.
Use Net / Sub / Uni only when your node asks for Net / Sub-Net / Universe instead of a single number. Turn it on in Settings → Output → Art-Net → Net / Sub / Uni. The relationship is Net × 256 + Sub × 16 + Uni.
With it on and the route on Art-Net, patching takes the universe the same way.
sACN priority can be 0, 100 or 200. It is 100 by default, and it is the priority Kanau sends with its sACN output.
The transmitter you pick carries the universe your patch uses (U1 when the patch sits in universe 1). Next time, turning Bluetooth on reconnects to the same one, once you have slid to send. When a transmitter cannot connect or drops out, Settings → Output says what to check, with the system's own message in brackets.
connected for a transmitter that is linked and sending for one that is receiving data.With the same universe going out over both the network and Bluetooth, Settings → Output says so: U1: network and Bluetooth output are both on. That is a statement of fact, not a warning.
A CRMX receiver takes the output of the transmitter it is linked to. The same U1 on Kanau does not by itself feed one fixture twice.
Flicker only happens where a fixture really is receiving from both paths. Stop one of them there.
If a transmitter still refuses Art-Net after you turn Bluetooth off, check the transmitter's own settings.
| Shown | What it means, and what to do |
|---|---|
| Blocked U1 | When you slid, another console was already sending Art-Net on U1, so Kanau does not send on it. Tap it for the choices below. You cannot override the other sender |
| SHARED + IP or a device name | Another console appeared after this one started. Sending continues, so stop one of them if you need to |
Tapping Blocked U1 opens a row that names the sender, such as U1 In Use, with these choices:
| Choice | What it does |
|---|---|
| Join | Shown when the sender is a Kanau host. Opens Session to join it |
| Send U2 Only | Shown when other universes are free. Sends only those |
| Cancel | Closes the row without sending |
Kanau devices tell each other which universes they send, so two that slide at once do not both send. An sACN sender is shown in red in the send row, by name or IP. This is for information only: the universe is not Blocked, and Kanau keeps sending. Unicast senders and Bluetooth in other apps may not be detected.
LITE MODE turns this iPhone or iPad into a light that another console drives over Art-Net or sACN. It is not offered while BLIND is on.
The modes to choose from in step 2 are 1: BACK LIGHT ONLY 1ch and those in this table.
| RGB | HUE SAT |
|---|---|
| 2: SCREEN RGB 9ch | 3: SCREEN HUE SAT 8ch |
| 4: SCREEN 2 CELLS RGB 17ch | 5: SCREEN 2 CELLS HUE SAT 15ch |
| 6: SCREEN 4 CELLS RGB 31ch | 7: SCREEN 4 CELLS HUE SAT 27ch |
| 8: SCREEN 8 CELLS RGB 59ch | 9: SCREEN 8 CELLS HUE SAT 51ch |
| 10: SCREEN 4 STRIPS RGB 31ch | 11: SCREEN 4 STRIPS HUE SAT 27ch |
| 12: SCREEN 8 STRIPS RGB 59ch | 13: SCREEN 8 STRIPS HUE SAT 51ch |
| 14: SCREEN FX & MEDIA RGB 20ch | 15: SCREEN FX & MEDIA HUE SAT 19ch |
| 16: SCREEN COOKIE RGB 62ch | 17: SCREEN COOKIE HUE SAT 54ch |
| 18: ULTIMATE RGB 74ch | 19: ULTIMATE HUE SAT 66ch |
The screen reads WAITING until the first data arrives, then turns the color it receives; if the data stops, it keeps the last color.
On Art-Net, when two consoles send to the same universe, only the values of the console that arrived first are used. When that console stops for 5 seconds, the values of the other one are used.
BACK LIGHT ONLY uses only the light on the back, with one channel, Back Light. The screen stays dark.
The other modes start with Screen Dimmer and end with Back Light and Vibration. What comes between them depends on the mode.
Each channel works as follows.
Tap Media to open a list of numbers, 1 to 51, that hold images and videos.
The files stay on this device.
On the other console, patch it as Kanau Lite (chapter 03). On Art-Net it answers polling as Kanau Lite, so it appears under that name in the other console's list of nodes.
To leave, slide the switch at the top right across, then tap the × that appears. While LITE MODE is on, this device sends no DMX, MIDI is off, the screen is at full brightness and does not lock itself, and a guest leaves its session. Leaving puts the brightness and MIDI back, with output off again.
Kanau Lite is a free, separate app that turns a device into a light in the same way. The values of each FX & MEDIA, COOKIE and ULTIMATE channel, and how Kanau Lite differs from LITE MODE, are on the Kanau Lite page.
The lower half of Output is there to show you where things stopped. It is not a set of settings. When output is slow or missing, read it from the top (chapter 14).
| Item | How to read it |
|---|---|
| Destination | Where it is really going. ↦ after an address means unicast to a node that answered |
| Medium | The connections in use, for example Wi-Fi + Ethernet |
| Network Output | Packets sent over the network in the last second. Bluetooth is not counted here (see below the table) |
| Clock | The worst gap between sends. About 23 ms is normal. Over 100 ms points at the phone |
| Touch → DMX | From your finger to the packet. About 25 ms is normal |
| Nodes Answering | How many answered, with name, address, connection and round trip (see below the table) |
| Type these into the node | The Net / Sub / Uni to enter on the node, when that display is on |
Notes on the table:
These narrow the problem down; they do not prove success. They are what Kanau sent, and whether the light received it cannot be seen from here. Network Output can show a figure while a mismatch or a fault at the other end keeps the lights dark. Gear that does not answer polling shows 0 under Nodes Answering even while it is receiving.
Settings → DMX Monitor shows all 512 channels of each universe as they go out. It refreshes 10 times a second. Reading it does not affect sending. A universe that is not going out, because it is OFF or has not been slid open, shows its heading with OFF and no values.
The cells only show values; nothing can be typed here. A lock whose fixture has been deleted is listed above the grid, with UNLOCK.
The values read as percent or as raw DMX, following the same setting as the rest of the console.
With more than one universe, a Universe pulldown sits beside the unit button. Choosing one opens that universe and jumps to its start.
Each universe can be folded separately. A folded heading still shows its count of active channels, so you can see which one is busy without opening it.
↑ ContentsRegister the lights you are using, and set the model, DMX mode, universe, address, number and groups.
Intensity and color are set on Home (chapters 04 and 05).
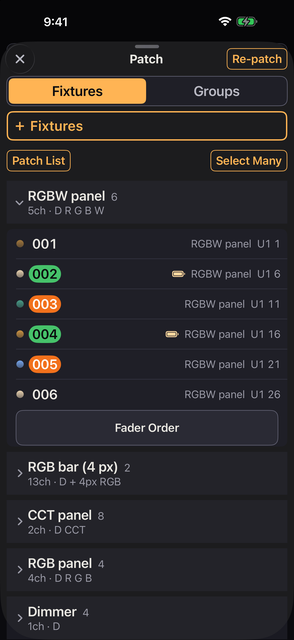
At the top of Patch, Fixtures | Groups switches between the fixtures and the groups. + Fixtures and + Group always sit at the top of their side. On iPad, where Patch has two columns, both sides show at once.
Most of the time, Manufacturer, Fixture, Mode, How Many and Universe / Address are all you need to set.
| Field | What it is |
|---|---|
| Favorites | Where modes and manufacturers are starred. Tap a ★ to add or remove a favorite (see below the table) |
| Name | This fixture's own name. It appears in Patch and the Patch List. Defaults to the full model name plus a running number, such as Titan Tube 1. The name under the faders is separate (see below the table) |
| Number / How Many | The fixture's number (its Fixture Number), and how many to add, up to 4,096. Leave the number empty and the fixtures are numbered for you, from the highest in use plus one |
| Label | The display name shared by every fixture of that model in the same mode. It runs under the faders. Defaults to the official model name (see below the table) |
| Universe / Address | The universe and start address. Defaults to U1 and the next free address. U0 is allowed (see below the table) |
| Gap | Empty channels left between fixtures. A short note beside the field says so |
| BATTERY SAVE | Marks the new fixtures for BATTERY SAVE |
| Label Color | The background of the number. Seven colors, or none |
| Map | The 512-channel layout. Drag and release to set the start address (see below the table) |
| TOGETHER / FILL GAPS | The pulldown left of Add. Chooses how the new fixtures are placed (see below the table) |
Notes on the table:
Free: 1 – 512 (512 ch). It reads Does not fit in amber if the fixtures will not fit there, and Free: None if nothing is free.U46 · 2 / 512. Choosing one moves there, and the start address becomes the first free space that holds every fixture you are adding.Does not fit does not appear.Each fixture after the first starts at the previous start address plus the mode's channel count and Gap. The addresses do not overlap.
(16 ch step).U1 1 → U1 203 (5 × 4 ch).Afterwards a panel lists what went in, one row per fixture, with its number, name and address. At its head is a line like Added 3 × Titan Tube — U1 1–15. When the places are not in one run, it shows the first and last address, as in U1 1 → U1 203. It stays until you tap OK, so you can keep patching and read it afterwards.
Patched, under the form, lists the models already patched. Tap a row to open the form with that model and mode filled in.
A fixture has one number, its Fixture Number. Home's number buttons, the panel title, Fixture Sheet, Labels and command entry (chapter 08) all use that same number.
The number is never empty. A fixture patched with the number left empty, a fixture whose number you clear, and a fixture in an older show without one are numbered from the highest in use plus one, with three digits such as 001. Gaps are not filled. Giving two fixtures the same number raises a warning but is allowed.
This version ships with 61 manufacturers, 1,062 fixtures and 15,454 modes. For anything not in the library, use the Generic definitions or Custom Fixtures.
Three manufacturers in the list are not makers of lights:
| Manufacturer | What it holds |
|---|---|
| Generic | Dimmer, Dimmer 16-bit, Bi-color, CCT, RGB, RGBW, Dimmer + RGB and Dimmer + RGBW |
| Tungsten | 40 one-channel lights that dim warm, worked through a dimmer (see below the table) |
| Kanau | Kanau Lite, a device in LITE MODE (chapter 02; see below the table) |
Notes on the table:
Lite 1, Back 1 and Vibe 1.There are also the following kinds of mode.
Patched lists fixtures by model and mode. Tap a heading to fold it.
U1 1–9 when they run on, or as the first and last, as in U1 1 → U1 203, when they do not.Patch List, under the Patched heading, shows every patched fixture in address order, universe by universe. It is there to read while you set addresses on the fixtures themselves; nothing in it can be changed.
⚠ marks any of these.
Sending continues while it is showing, so check the settings.
Two fixtures on overlapping addresses can both be used. An overlapping address sends the value of the fixture you moved last. On Home, a fixture that overlaps carries a red ! above its value.
n fixture data problems refers to faults found while loading fixture data. Tap it for details.
Working in the Patched list does not change which fixtures Home is showing.
Both are in Settings, below DMX Monitor. Fixture Sheet also opens from FIXTURE SHEET in the Play list. Opening either one does not change the show. Fixture Sheet is not available on a device that has joined a session, or while BLIND is on.
Fixture Sheet shows the current state of every fixture, in the order of All on Home: number and name, address, intensity, color, any running effect, and marks such as LOCK and OFF. Tap a row to open the same panel you get by holding that fixture's round icon (intensity, color, effect and setup), and adjust it there.
Labels, in Settings below Fixture Sheet, makes stickers for the fixtures as an A4 PDF, in address order.
Under the preview, Page 1 of 3 says how many sheets there are, and ‹ › step through them. Export PDF saves it.
Tap Select Many and choose the fixtures. The ✓ on a model row takes all of that model. A fixture is ticked only in the row you tapped, not in its other rows.
Each ✓ shows the order you picked it in, from 1. Naming, numbering and addressing follow that order.
| Action | What it does |
|---|---|
| Select All / Select None | Takes or clears everything, folded rows included |
| Name | Numbers the end of the name in the order you selected |
| Number | Sets fixture numbers in the order you selected |
| Address | Re-addresses them from a universe, start address and gap |
| Battery | Marks or unmarks them for BATTERY SAVE |
| New group | Builds a group from the selection |
| Delete | Removes them. Check the count before you confirm |
Deleting a fixture also removes its intensity, color and limits, and takes it out of every Scene. HISTORY can undo it.
Deleting from within a group only removes it from that group; the fixture itself stays. If that leaves the group empty, the group is deleted too. The confirmation says so.
Only ranges large enough are offered. Where two fixtures overlap, both are shown in red.
Close Gaps, at the top right of Re-patch, packs the fixtures of one universe from address 1, in address order. Gaps you left on purpose are closed up too.
A new group's name starts with a number, given for you. It is one more than the last numbered group in the group order (1 if there is none).
Command entry calls a group by this number, as in GROUP 3 (chapter 08).
A fixture can be in several groups. It is not copied: changing it from any group changes the same fixture. Adding it to a group leaves it in All.
Tapping a group name lets you set the name, see the count and address range and layout, or delete it. Edit Group adds fixtures to the group, and holds Fader Order for it under the list of fixtures (chapter 04); Add to an Existing Group puts the current selection into a group you already have.
Group Order, in the row under + Group, sets the order of the groups. It appears once there are two or more groups, and is not shown to a guest.
Drag the handle at the right of a row; Home's model and group buttons and this list then follow the same order. All is not in the list and always comes first. Each move is one step in HISTORY.
RENUMBER in Group Order asks Renumber Groups? first. Renumber All then numbers every group 1, 2, 3 and so on in the order of the list.
The number goes in front of the name and replaces any old one. The order does not change. It is one step in HISTORY.
Whether Patch shows an All row is set in Settings → Settings → Display → Groups → Show the All Row.
Custom Fixtures holds definitions you add yourself. It is on the Patch tab, under + Fixtures and the list of models. The definitions are available to every show. Deleting a definition does not affect fixtures already patched from it.
SAVE & PATCH opens the patch screen with that definition selected. Remember on This Device stores your sign-in; FORGET removes it. Definitions you already fetched stay. Your sign-in goes to GDTF Share.
Tap + Import a GDTF File, tap it again in the panel that opens, pick the .gdtf, check the mode and the import report, then save. No network is needed.
The report lists what could not be carried over. A 16-bit value split across distant addresses keeps only its coarse byte, unused addresses are held as empty slots, and channels on another DMX break are dropped. Where addresses overlap, the earlier channel wins. Unknown functions keep their original names.
A definition marked Imported data is not verified. should be checked against the real fixture. Fix wrong roles with SAVE & EDIT; the fix applies to fixtures you patch from it afterwards. This mode has no channels. means you should pick a different mode.
Open + Build by Hand and start from one of these.
Copy an Existing Fixture, on the same screen, starts from a fixture in the library instead (below).
Give each channel a label, and set the role, 8 or 16 bit, default and real-world unit as needed.
Each channel also has a Pixel: None, or a number.
Open + Build by Hand → Copy an Existing Fixture and choose Manufacturer, Fixture and Mode. The copy is named "… (Modified)" and is listed under MODIFIED in the Manufacturer list. Duplicate and Edit lets you change the name, the color temperature range (shown only when there is a CCT channel), channel roles and names, labels and defaults. The channel count, the 16-bit layout, the ranges and the switch structure cannot be changed.
Free sends addresses 1–64 of Universe 1. No feature is limited, and there is no limit on how many fixtures you can patch. Kanau Pro sends every universe and address.
The top line of Settings shows where you stand.
On the right is a status such as Free, Monthly plan or Lifetime purchase. Tap the line, or the line under it, to open the Kanau Pro purchase screen. When you buy, the purchase screen closes, you are back in Settings, and the line changes to Kanau Pro.
Kanau Pro comes as MONTHLY or LIFETIME. Both unlock the same things.
Buying LIFETIME while you pay for MONTHLY does not stop the subscription. Cancel it in Manage Subscription. Restore Purchases brings back both MONTHLY and LIFETIME.
While on Free, fixtures outside addresses 1–64 and fixtures crossing address 64 are not sent. You can still patch them, and these marks show what is not sent.
While on Free, Kanau Free shows at the top left of the screen for 3 seconds when you start sending, and when you come back to Kanau from another app.
A guest showing the host's patch does not show these marks.
↑ ContentsThe faders on Home. This is the heart of Kanau.
A fader responds to the distance your finger travels, not to the place you touched. You can drive it from the number, the round icon, or the empty space below the fader. It is built so you can work while looking at the stage instead of at your hand.
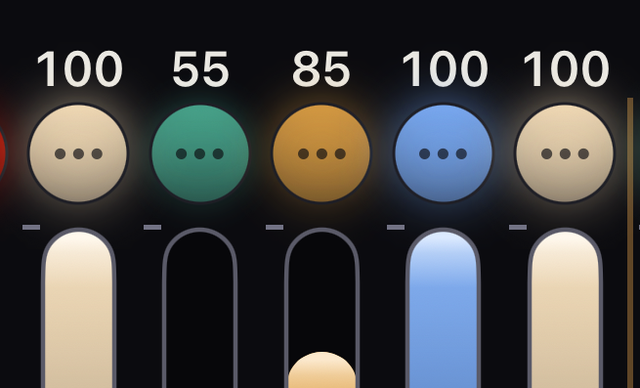
The knob grows a little as you touch it, and nothing moves until you have dragged a short way, so resting a finger on it is safe. The light along the fader goes out when the number above it reads 0, so a fader at 0 never looks like it is at 1. If you have set limits, the fader moves within them.
A light haptic tap comes the moment the fader you are moving reaches its upper or lower limit, including a limit you set; it is not repeated while you stay there. ZEN and the grand master do the same. A locked fixture, or a guest that cannot write, gets none.
While you drag, the number, the name shown under the faders and the value appear large at the top of the screen. On a fixture that carries color, the readout also shows the following.
G or M with a number, when the green / magenta tint is off neutralThe gel's name is shown for as long as the color is still the one you set. A color that only happens to match a gel is not named. A white is named from its kelvin value.
A plain dimmer shows none of that. The GRAND, FREE and group master faders show no large readout at all. Read their value from the number above each fader.
A number shows at the bottom of each fader. It is the fader's place on the page, counted from the left, and it starts at 1 on every page. A pixel column counts as one fader. It is there to match the faders on a MIDI controller, and counts the same way as Fader N in chapter 12.
To hide the numbers, turn off Settings → Settings → Display → Faders → Fader Numbers.
| Action | What happens |
|---|---|
| Short tap | Cycles normal → FINE (1/10) → FINE+ (1/20) → normal |
| Hold | The next step while held. Back to normal when you let go |
Switching mid-drag does not make the value jump. FINE also applies to raw channels and to Pan and Tilt.
Select two or more round icons, then drag one of the faders. They all move by the same amount, keeping the differences between them. When one reaches a limit the others carry on. Locked fixtures are left out.
In the COLOR panel, the Intensity slider and ± also move each fixture from its own value, and the ratio row scales each fixture from its own level. Only the 0–100 number buttons and typing a value put every fixture on the same value (chapter 05).
The + − button at the bottom right sets the mode.
| Mode | While a number button is held |
|---|---|
| LOCK (the default) | Nothing changes |
| + | Goes to the Piano + level, 100 by default. Never above the fixture's upper limit, and never lowers a fixture that is already higher |
| − | Goes to the Piano − level, 0 by default. Never below the fixture's lower limit, and never raises a fixture that is already lower |
Let go and it returns to where it was. You can hold several at once, or slide sideways to play them in turn. Locked fixtures do not respond.
The buttons turn red while + or − is armed. It is always LOCK at launch. The two levels are set in Settings → Settings → PIANO → Piano + and Piano −, for this device; when either differs from 100 or 0, the + − button shows it, as +80 or −20.
Tapping ⏻ turns a fixture's output off and on while keeping the value. It turns purple while off, and the number stays. Moving the fader while it is off does not light anything.
A tap fades over Power Fade. Power Fade is SNAP, 0.5, 1, 1.5 or 2 seconds, 1.5 by default. Set it in Settings → Settings → Fade Times.
ON/OFF is the default. In the fixture's Power Switch you can change it to FLASH ON or FLASH OFF, which last only while held, or to NONE. Locked fixtures do not respond.
Power Switch also has LOCK. With Power Switch set to LOCK, the button in the place of ⏻ turns that fixture's lock on and off. It is the one button a lock does not stop — if it did, a locked fixture could never be unlocked from here.
Turn on Switch in a fixture's panel (chapter 06) and its fader becomes a rocker the full length of the fader. ON is at the top and OFF at the bottom. Each tap switches it the moment you press.
If B.O. or BATTERY SAVE is holding its output down, it looks OFF too. The number above reads OFF, the lower face is the plate with an edge of purple for B.O. or green for BATTERY SAVE, and the upper face is flat. When the hold ends it shows ON again, because its own ON or OFF was never changed.
A fader set as a switch works with the other functions as follows.
Tapping GM at the top opens the masters panel. GRAND, the grand master, is at the right end, with FREE and the group masters to its left (see the next section). Close it with the × at the top left.
Holding GM opens a panel with 100, 75, 50, 25, 12.5 and B.O. B.O. there turns the blackout on; it does not set GM to zero. On iPad the panel has these down the left, the fader in the middle and the fade buttons down the right. On iPhone they are across the top, the fade buttons at the bottom, and the fader takes the room between.
The fade for these buttons is Grand Master Fade: SNAP, 0.5, 1, 1.5 or 2 seconds, in the panel you get by holding GM and in Settings → Settings → Fade Times. Both set the same value. SNAP is the default.
The fade starts gently, is fastest in the middle and lands gently; the time is the whole fade. A guest in a session does not see this setting. Dragging the fader with a finger is always immediate.
A fixture with Lock on does not respond to GM or B.O. It stays lit. The count of what is still lit during a blackout, locked fixtures included, is shown next to the green 🔒 at the top of the screen.
In the panel you open by tapping GM, FREE sits to the left of GRAND, and the group masters to the left of FREE, in the order of your groups. The name tags are red for GRAND, amber for FREE and white for a group (GROUP and its name). When the group masters do not all fit, ‹ › under the leftmost one turns the page.
A group master scales the intensity of the fixtures in that group in proportion. A fixture in two groups follows the lower of the two masters.
The FREE fader scales the FREE fixtures (chapter 08). It is there even when no fixture is FREE.
On iPhone, the panel you open by holding GM also carries the group masters to the right of the GM fader. The FREE fader in that panel is there when any fixture is FREE or while the FREE master is down. When those do not all fit, ‹ n/m › at the side turns the page.
While a master is down, the following is shown.
Fixtures shows by model and mode; Groups shows All and the groups you built. Tap a name to switch. One fader is always one fixture, even inside a group.
The order under All starts grouped by model, then in patch order, and a group starts in the order you built it. You can change any of them (see Changing the order of the faders below).
‹ and › change page. On the last page, › goes to the first page of the next model; on the first page, ‹ goes to the last page of the previous model. Under Groups, they stay inside the group and never go on to the next one. They stop at the very ends, and never go into or out of All.
Swiping across the band with ‹ and › does the same. Changing the fader count keeps the fixture you are working on in view.
While you hold a fader, none of these — the names, ‹ and ›, the fader count, PIXELS or PIANO — changes what is on the page. Play's BACK and NEXT do not move the Scene either. Pressing one gives a warning vibration instead.
The faders on Home go in an order you can change. Each page keeps its own: All, every group and every model. Only the order of the columns changes. The light, the limits, the locks, and the fixture number stay with the fixture.
There are two ways in. The first is Fader Order in Patch. Fader Order is in these places.
Fader Order is not shown to a guest, and Patch is closed while BLIND is on.
Fader Order opens a list of the faders in order, starting from the page you pressed it in. ‹ is at the top left. A menu at the top chooses All, a group or a model. Reset Order beside it rebuilds the page the list is showing, from the same bases as RESET ORDER below.
Each row shows the following, from the left.
Hold the handle and drag the row up or down: the rows around it move aside, and it goes in where you let go. One row moves at a time.
An amber line under a row marks the end of each page of Home. When a fixture on the page has PIXELS open, the list numbers fixtures rather than faders, and no amber lines are shown.
The second way is to make Home itself the editor. Hold the heading above the faders, the one with the page name and ‹ ›. The heading turns into ‹ REORDER, the page name, [n/m] › and DONE. The faders are dimmed and do not respond, so touching them changes no brightness.
Hold a column, from the icon down to the fader, and drag it sideways: the column keeps its look, with a thin green edge, and follows your finger. The columns in between slide over by one place to open the spot where it will go in. It settles there when you let go. The lifted column stays within the columns and never reaches the buttons along the bottom.
While you hold it, its round icon turns green and shows a number: the place it will take if you let go now. The number is counted through all the pages of that button (All, a group or a model), one number per fixture, the same as in the Fader Order list.
A column can cross pages.
These rules apply when turning the page.
‹ and ›, and the buttons that choose the page, still work, and carry on reordering the page you pressed. A fixture with PIXELS open moves as one block. Reordering will not start while a finger is on a fader, and a warning vibration says so.
In place of the buttons along the bottom there is one key, RESET ORDER. Press it and choose a base: Patch Order, Fixture Number, DMX or Model (a model's page has no Model).
The page being reordered is rebuilt the moment you choose, as one step in HISTORY. Pressing the key alone, or Cancel, changes nothing.
While you reorder, the ⏻ row of each column becomes a lightbulb button. Press it and that fixture draws one peak of brightness, so you can see on stage which fixture the column is. The ⏻ row does not grab the column.
Pressing the lightbulb does not change faders, ⏻, Scenes or HISTORY. Locked fixtures, fixtures in a universe whose output is off, and anything during B.O. do not light. GM and BATTERY SAVE still apply. On a guest, the host lights it.
Tap DONE to finish. It also ends when you leave Home, when the app goes to the background, when you become a guest, and when you enter or leave BLIND. GM, BATTERY SAVE and SCREEN LOCK keep working during it.
The order belongs to the show: it is saved in the show file, and a guest sees the same order. One move is one step in HISTORY, shown as order.
The host, a device on its own and a guest allowed to control can change the order. A guest's change is made on the host.
MIDI knobs and Switch N follow positions, so they follow the new order. So do the direction of an effect, the direction of PIXELS and the rows of the Fixture Sheet.
A show with no order of its own opens in Model order. Fixture Number in Reset Order sorts once, when you choose it; typing the fixture numbers again later does not re-sort the faders.
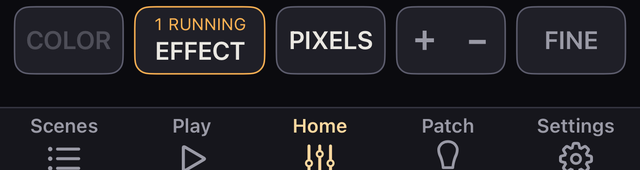
Tapping PIXELS opens the cells of the selected pixel fixtures on the page, or of every pixel fixture on the page when nothing is selected, as their own faders. It never opens or closes a fixture on another page. The cells sit right after the fixture's own fader, with number buttons .1, .2 and so on, and each carries its own intensity and color.
Tap again to fold them. Folding a fixture lets go of its pixel selection.
A fixture with pixels carries P above its value. A fixture whose pixel order is inverted (chapter 06) carries R instead, and its pixel faders run the other way: the leftmost is the last pixel.
A fixture whose address overlaps another carries a red ! above its value (chapter 03).
Selecting a cell opens PIXELS for its fixture. A fixture is selected whole or by cell, never both. A fixture selected whole shows a faint ring on its cells, and tapping one cell lets go of just that cell.
Select more than one cell and they move together on one fader, the same way fixtures do. Each keeps its distance from the others, and the ones that reach an end stop there.
A cell's fader is the percentage of the fixture's own fader (the parent) that the cell gives out. It runs from 0 to 100, and a cell you have not touched is at 100. The light that comes out is parent × cell ÷ 100.
Lowering the parent does not move the cells' numbers or knobs. The fill of a cell's bar reaches the height of the light actually coming out, and the part the parent is holding down is marked with the same amber ↓ as a group master. Raising a cell while the parent is at 0 leaves it dark: the parent never rises by itself. Select the parent and move it, and all its cells change together.
CLEAR n only clears the selection. Values and outputs are untouched.
Tap ZEN in a fixture's panel for a black screen with one large fader and its value. It is there for fixtures whose intensity you can set. It also opens from ZEN in the Play list (at the end of this section).
It opens on a selection as well: hold a round icon, or open COLOR, or hold a model or group button. The name at the bottom says what you have: 3 fixtures, or KEY · 8 fixtures.
With more than one, the one fader raises and lowers a shape of levels. The shape is each fixture's level with the fader at 100. Take two fixtures at 100 and 50: raised from 0, both brighten in the same proportion, and at the top they stop at 100 and 50. They go no higher.
The number on screen is how much of the shape is up. Opening changes nothing.
The shape is remembered. The number you see when ZEN opens is decided as follows.
A ZEN group's shape is saved in the show. What moves is each fixture's own fader, so a Scene records it. Each stops inside its own limits, and locked fixtures do not move. This is a different rule from the Intensity slider in the COLOR panel (chapter 05).
Drag anywhere on the screen to work it, relative as usual. FINE, under TILT at the top left, is the same FINE as on Home. Tap it for FINE, FINE+ and off, or hold it for as long as you need it.
On a single fixture the settings at the top right hold the limits, TILT's angle and FIXTURE SETTINGS. FIXTURE SETTINGS opens the fixture's panel on its SETUP tab and comes back to ZEN when you close it. With more than one, these settings are not there.
A fixture set as Switch shows a rocker instead of a fader: each press turns it ON at its upper limit or OFF at its lower.
The way out is the × at the top left. Tapping the screen does not leave. Neither does moving the fader and letting go.
TILT at the top left hands the fader to the angle of the phone. The 0 AT angle in the settings is the bottom of its travel and the 100 AT angle is the top. The ends are 0 and 100 with no limits set, and the limits themselves where you have set them.
It keeps working after you take your hand away, and it follows a quick hand without lagging behind. It does not grab at once: it waits until the tilt meets the level the fader is already on, so nothing jumps.
Lying flat, the phone is at 0°. 0 AT is 0°, 15°, 30° or 45° and 100 AT is 90°, 60° or 45°, starting at 0° and 90°.
The two stay at least 30° apart, so a pair that is too close cannot be pressed. A small diagram beside them shows the range you chose. The closer the two angles, the less movement it takes to reach the top.
0 AT and 100 AT can also be set under ZEN TILT in Settings → Settings. It is the same setting, so a change in either place shows in both. With several fixtures selected, set it under ZEN TILT in Settings → Settings.
Lowering the phone's top edge below flat keeps the fader at the bottom until the phone points straight down. Continuing toward face down brings the fader up as far as you turn, reaching the top when the phone lies face down. The value does not jump in any position.
Reaching the top gives a short vibration, and the phone keeps vibrating while the fader stays there. Reaching the bottom gives one short vibration. Pulling the fader with a finger turns TILT off, and so does leaving ZEN.
+ FADER at the top right adds another fader: up to three on iPhone and five on iPad, counting the first. It opens a list of Groups and Fixtures; tap one to add it as a fader of its own and close the list. A fixture already on another fader is dimmed.
The screen divides into columns, each worked on its own, relative as usual, with its number at the top and its name at the bottom. A group reads like KEY · 8 fixtures and follows the rule above. Each column has its own ⚙ at the bottom, with its limits, FIXTURE SETTINGS and, from the second column on, Remove fader.
With two or more faders the ⚙ at the top right is gone, and TILT switches off and is not shown; FINE takes its place. When you are back to one fader, both return, with TILT off.
ZEN in the Play list opens a panel for choosing what ZEN works on. From the top, the panel has the following.
All · 24, narrows the list to one model or one Home group. Closing the panel puts it back to All.New Group makes an empty ZEN group. Edit on a ZEN group's row sets its name, the fixtures for the first fader (①), and the faders for the second and third (② and ③) (added with + FADER), and Delete Group removes it. ② and ③ are kept, and appear as columns when you open ZEN on that group.
↑ ContentsColor and intensity for one fixture or many.
What you see depends on what the fixture actually has. A one-channel dimmer shows only Intensity. Kanau does not show controls a fixture does not have.
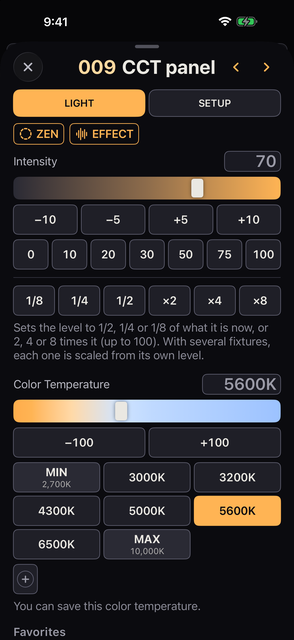
| How | What it works on |
|---|---|
| Hold a fixture icon | That one fixture |
| Hold a cell icon | That cell |
| Select round icons, then COLOR, or hold one of the selected icons | Everything selected. A fixture with PIXELS closed counts whole; with PIXELS open, its pixels count — all of them when its own icon is selected, or only the pixel icons you selected |
| Hold a model or group button | Every fixture in it. All means every fixture |
Tabs run across the top of the panel: LIGHT, MOVE, GRADIENT and SETUP.
MOVE and GRADIENT appear only for a selection that can use them. When the panel is laid out in two columns on iPad there is no SETUP tab; the names and the fixture settings are in the right column.
In a panel opened by holding a round icon, these are available.
ZEN (LIGHT): opens one large fader (chapter 04).EFFECT (LIGHT): opens that fixture's effects (chapter 09).NEXT row (SETUP): sits under the Fade Time heading and shows the Delay and Fade into the next Scene (chapter 08).On iPhone, SETUP is not a tab that swaps the contents but a shortcut to the Settings that continue below. Scroll past the end of LIGHT, MOVE or GRADIENT and the Settings heading follows, with the names, Fade Time and the fixture settings.
‹ and › appear in the following panels. They do not appear on a cell's panel or on a panel for several fixtures.
They move to the previous or next fixture of the current Home scope (All, a model or a group), across pages, and stop at the ends. The open tab is kept. A Label, Name or number you have typed is committed before the move.
A panel for a selection names what it works on under its title, such as 3 pixels or 2 fixtures. Color, Intensity and the limits then act on those alone, and pixels you did not select stay as they are.
Any selection opens COLOR, even fixtures with no color.
On iPhone a line at the bottom of the panel names the Scene you are working in.
UPDATE there records the current state into that Scene, as UPDATE in Scenes does. It can be pressed when it blinks.
| Item | How it works |
|---|---|
| Intensity | 0 to 100, by slider, typing, ± buttons, presets or the ratio keys |
| Color Temperature (CCT) | In kelvin, within the fixture's range |
| Green / Magenta | The green–magenta correction. The 0 button returns it to neutral |
| Crossfade | The balance between the white side and the color side. Which way round is up to the fixture |
| RGB and emitters | R, G, B, W, Amber, Lime, Cyan and whatever else the fixture carries |
| Hue / Saturation / CIE x / CIE y | Shown on fixtures that have them |
Intensity ±5 and ±10 snap to multiples of 5 or 10: from 47, +10 gives 50. With several fixtures selected, each one moves from its own level.
The presets are 0, 10, 20, 30, 50, 75 and 100. When the selected fixtures are at different levels, the number reads — in amber and no preset lights. The slider stays at the first fixture's level. The number comes back once they match.
Below a dividing line, 1/8, 1/4 and 1/2 set the level to that part of what it is now, and ×2, ×4 and ×8 multiply it, up to 100.
With two or more fixtures or pixels that have intensity, the Intensity section of the GRADIENT tab (below) has one field. It starts empty and shows the levels as you press the keys, such as 0 THRU 100 THRU 0. That same row is written under it as an example.
To type the levels:
Tap the field again to close it without changing anything. The first key you press after opening decides what happens.
How the levels are spread depends on how many you type.
A locked fixture does not move, and each fixture stays inside its own limits. It works with mixed models. Each ENTER is one step in HISTORY.
The CCT presets are 2700, 3000, 3200, 4300, 5000, 5600, 6500 and 10000 K. Beyond the fixture's range you land on its limit, marked MIN or MAX. A fixture with only two color temperatures shows two buttons instead of a slider.
Where a fixture has more than one crossfade, the later ones appear just above the controls they feed.
| Item | What it is |
|---|---|
| Gel presets | LEE and Rosco presets for fixtures with RGB. Separate tables for 3200 K and 5600 K |
| Preset / Gel | The fixture's own built-in gels or color presets, chosen by number |
| Gels → x/y | The makers' own CIE x/y tables, for fixtures with x and y: LEE, 295 filters, and Rosco, 1,079. Choose the light source from the menu at the top (see below the table) |
Notes on the table:
The RGB values under Gel presets come from Astera's published color data. They carry no brightness, so set that with the fader. With a fixture's built-in presets, the app cannot always show which one is selected.
The x/y tables are the makers' values, sent as they are. Rosco's are its myColor figures, which use the 10° observer.
On a fixture whose Crossfade runs from a color temperature to a color, picking a color moves a Crossfade that sits at the color-temperature end over to the color end, so the color shows. This holds for the picker, a gel preset and Gels → x/y alike.
The list stays open after you pick, so you can try one after another. A long list has an index down its right edge — the hundreds of the gel number, or the first letter of each heading — and tapping one jumps there. Close it with × at the top left.
Whether it appears at all is set in Settings → Settings → Display → Gels → Gel presets.
Saved colors and color temperatures appear as buttons under the Favorites heading.
Saving opens the new button's editor so you can name it. Its Save cannot be pressed while the name is empty: Name this color asks for one. Closing the editor without a name throws the new color away.
Tap a stored button to apply it. Hold to rename, edit or delete. Edit covers everything it stores: RGB or the emitters, x/y, the Crossfade, and the color temperature and G/M.
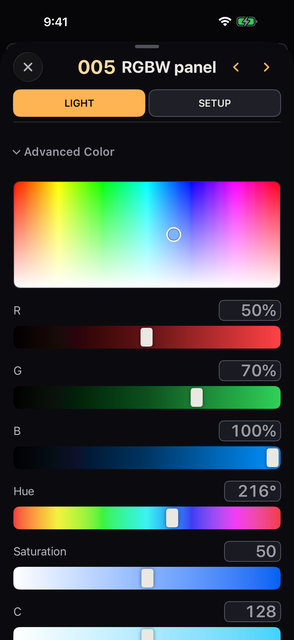
Advanced Color gathers the controls the app works out for itself, rather than the fixture's own channels.
In the picker, hue runs across and saturation down. Brightness is the fader's job.
RGB, the Hue and Saturation worked out from RGB, and CMY (255 − RGB) appear on fixtures that can take them. On a fixture that takes only Hue and Saturation, or only x and y, they restate the fixture's color at full strength, and setting them reaches the light; brightness stays with the fader. A fixture's own Hue, Saturation or CMY channels are not repeated here.
In this panel, whatever you touch lands on the same value for everything selected. That is true of the color sliders, the Intensity presets from 0 to 100, typing and the stored colors alike.
There are these exceptions.
With two or more fixtures selected, or two or more pixels with PIXELS open, a GRADIENT tab appears. The tabs read LIGHT | MOVE | GRADIENT | SETUP, or LIGHT | GRADIENT | SETUP when none of them has a MOVE panel.
GRADIENT is not there in the following cases. A panel last left on GRADIENT opens on LIGHT in those cases.
GRADIENT holds these.
The Color section appears only for fixtures of one model in one mode with PIXELS closed. With anything else, GRADIENT holds only Intensity. With PIXELS closed, the LIGHT tab has no layout buttons and no keypad row: it writes the same color to everything selected.
With different models selected, only Intensity, CCT, G/M and ★ appear. Open one model on its own to set RGB and emitters. CCT is held within each fixture's own range.
Hold a cell icon to set that cell's color and intensity. Changing the fixture's own color sets every cell except those you changed by hand, which keep their own. The fixture's own Intensity applies across all the cells. Intensity on a cell's own panel moves that cell only.
Where a mode carries the same color role more than once, such as Gel 1 and Gel 2, the later groups appear lower in the panel. Every color group is stored in a Scene, and comes back with it as long as the fixture is still in the same mode.
With PIXELS open on Home, the LIGHT tab of a pixel fixture's COLOR panel starts with a PIXELS section. It lays color out along the pixels in one go, on every fixture you have selected. It appears only where the pixels have color channels, such as RGB or Hue and Saturation.
Select only some pixels and it works on just those. They are treated as one line in their order on Home, and EACH and ACROSS do not appear.
| Button | What it lays out |
|---|---|
| SOLID | Every pixel follows the fixture's own color |
| GRADIENT | START on the first pixel, END on the last, blended in between |
| ALTERNATE | COLOR 1 and COLOR 2 taking turns, or three colors with COLOR 3 |
| RAINBOW | The hue circle along the pixels |
The button you pressed lights amber, and so does the end or color you are setting — START, END, or COLOR 1 to COLOR 3. The sliders, presets and gels below then write to that one. There is nothing to confirm: the light changes as you go, and HISTORY steps back.
These change the pattern. None of them appear on SOLID.
On GRADIENT, they all move intensity along with color (on FIXTURES, with PIXELS closed, color only).
The row of dots is the first selected fixture's pixels, or every fixture's under ACROSS. Each dot is read from what is going out.
Tap a dot to set that pixel alone with the controls below, and tap it again or ALL to go back. Setting START or END again redraws the blend, pixels set by hand included.
With several fixtures, the pattern is laid out in one of these ways.
The pattern follows the pixel numbers, so a fixture with inverted pixels (chapter 06) starts from the same side on stage. Its own dots show START on the right.
+ saves the pattern and its colors as a palette and asks for a name. Tap a palette to apply it, and hold it to rename or delete it.
Fixtures with Lock on and fixtures running a color effect are left as they are. A Scene stores the colors like any other.
Select two or more fixtures of the same model in the same mode, with PIXELS closed, and the GRADIENT tab shows the same section under FIXTURES.
A color effect — RAINBOW, the colored fires, lightning and fluorescents — runs on any fixture that can make color, whatever mode it is in: RGB, CMY, Hue and Saturation, or xy.
While one runs, the color controls for that fixture are there to read, not to touch. A band at the top of the panel carries a dot lit in the color going out and the name of the effect, and says the color cannot be edited. Intensity still works.
The values under the band are the color that comes back when the effect stops, so they stay where you left them.
A mode with no color, or an effect that does not move color, leaves the color controls working as usual.
The band also carries the values going out at this moment. Hold the round fixture icon to open this panel and read them.
↑ ContentsLimits, Lock and the raw channels of a single fixture.
In the panel you get from holding a fixture icon, from COLOR, or from holding a model or group button, tap the SETUP tab at the top. On iPad, when the panel is in two columns, the settings are in the right column; on iPhone they are under Settings, further down the panel.
Limits, Lock, FREE, Power Switch, BATTERY SAVE and Switch can be set for several fixtures at once. Mixed values show in amber, as — or n of m (for Switch, n of m set as Switch), and changing one applies it to all of them. Channels, Mode, Channel Roles and Patch appear only with a single fixture open.
The panel opened from a fixture in the Patch tab has BATTERY SAVE, Switch, the Invert rows, the limits and Label Color below the Re-patch button. It has no Lock, Power Switch or Channels; those are in the panel from holding the fixture's icon.
On a panel for selected pixels, the settings reach as follows.
The title at the top of the panel is read-only: the fixture number and the name shown under the faders. At the top of SETUP, two lines name the fixture.
Under the faders, in titles and in the large readout, a fixture shows its Name if it has one, and its Label if not.
In the panel opened from the Patch tab, or by holding a fixture's round icon on Home, ‹ and › move to the previous or next fixture. They do not appear on a cell's panel or on a panel for several fixtures. In the panel from the Patch tab, Re-patch turns the title into a field for the fixture's name in Patch, the name the patch lists show.
Label Color is the background of the number. No label color clears it.
Lower Limit and Upper Limit set the range you can work in. Change them with ±1 and ±5, or clear them. Outside a limit, Home shows orange hatching.
A cell's limits apply inside the fixture's own. If the fixture is capped at 50, a cell capped at 80 still cannot pass 50.
Fixture Lock holds a fixture's output where it is (an effect running when you lock keeps running). The grand master, blackout, BATTERY SAVE, MIDI, the session and Scene recalls do not change it — a locked fixture will not go out when you press blackout. Check your locks before a take.
With Lock on, the fixture's output is held. Faders, piano mode, ⏻, color, raw channels, GM, B.O., BATTERY SAVE, MIDI and the session all leave it alone, and so do Scene recalls.
Lock holds the DMX values at the fixture's addresses just before they go out. Unlocking returns the output to what Kanau is working out now, with the grand master, B.O., BATTERY SAVE and the rest applied.
Lock also behaves as follows.
Locks and limits belong to the console, not to a Scene. No Scene records them, and a recall never locks, unlocks or moves a locked fixture.
Unlocking does not bring in a Scene's values on the spot: the faders and other values stay as they were when you locked. The Scene's values arrive with the next recall.
Lock This Scene is a different thing (chapter 08), and chapter 08 covers what a Scene stores.
With several fixtures selected and some of them locked, tapping Lock clears every lock. With none locked, tapping Lock locks them all.
Locking during a piano, FLASH or HIT press puts the temporary value back first, then holds. Changing limits while locked does not move the current value; it is brought into the new range when you unlock.
| Item | What it is |
|---|---|
| Power Switch | What ⏻ does: NONE, ON/OFF, FLASH ON, FLASH OFF or LOCK. ON/OFF is the default. LOCK makes each press lock or unlock the fixture |
| BATTERY SAVE | Marks this fixture for BATTERY SAVE (see below the table) |
| Invert Pixels / Invert Pan / Invert Tilt | Invert Pan and Invert Tilt reverse the direction of Move effects on this fixture only. Invert Pixels reverses the order of this fixture's pixels (see below the table) |
| Switch | Turns this fader into an ON / OFF switch (chapter 04). Not the same as Power Switch, which sets what ⏻ does |
| FREE | Scene recalls (the list, NEXT and BACK) leave this fixture where it is; faders and the piano still move it (see below the table) |
| DMX Mode | In the panel opened from Patch, shows the current DMX mode. On a fixture with more than one mode, Change beside it opens Re-patch at the mode list |
| Channel Roles | Corrects the role and name of each channel. Addresses do not move |
Notes on the table:
BATTERY SAVE 50% and 80 → 40 (the fader level → what goes out).Use Channel Roles when a patched fixture has channels being treated as the wrong function. To carry the fix into fixtures you patch later, edit the definition under Custom Fixtures instead.
With one fixture open, the bottom of SETUP shows these.
Use the dedicated controls for color, position and the rest first. Channels is for reaching functions those controls do not cover, one DMX channel at a time.
Channels lists everything in DMX order, under Dimmer, Color, Position, Gobo, Beam, Focus, Shapers and Control. Empty groups are hidden.
| Kind of row | How to work it |
|---|---|
| A continuous value | Slider, typing, or − and + |
| Named values and ranges | A menu up to 12 entries, a searchable list beyond that |
| Commands like Reset or Lamp Off | Hold for the stated time. Let go early to cancel. Commands with no time are a tap |
| A row marked FADER or COLOR | Driven by a dedicated control. Where the console has a knob for it, such as CCT or G/M, the row carries a slider and a number field to edit it here; where it has none, such as white or strobe, the row is only a label |
| A row that depends on another channel | Shows what is available in the current state. When the row is not in use, a note names the channel and the range that switch it off |
On a fixture whose second light source has its own dimmer, such as the Aura ring of a MAC Aura XIP, that dimmer is a row of its own here. The fader scales it: what goes out is the row's value times the fader, so with the fader at 0 it is dark.
Intensity effects do not move it. B.O., GM and BATTERY SAVE act on it as well.
DMX at the top right switches between raw values and percentages. Home on a row returns it to its default; on Pan and Tilt that needs a hold. It is unavailable when nothing has been changed.
Changes to raw channels are recorded in HISTORY. Whether they also go into the current Scene follows chapter 08.
On a pixel fixture, the fixture's own panel carries its own channels and a cell panel carries that cell's.
Edit from Re-patch in the Patch section. You can see and change the universe and address, fixture number, model and mode.
Each change here is one step in HISTORY.
Change Mode shows the range before and after and any fixtures it would overlap, before you confirm.
Apply to all: changes every fixture of the same model that is in the same mode as this one. Fixtures in another mode are left as they are.Kanau changes only its own patch: set each fixture's own DMX address to its Move to value.
After a confirmation, Delete This Fixture removes the fixture from the whole patch, not only from a group, along with its values and settings, and takes it out of every Scene. HISTORY can undo it.
A mode for checking by eye, on the morning of a rig or before kit goes out, that gobos do not stick and that the colors, pixels and head movement work. The steps are built for each model from its fixture data. The test does not change the show.
There are two ways in.
TEST MODE, with the same amber heading as Advanced. Tap it to open it. It tests that panel's fixtures.Both offer the same choices.
SIMPLE / FULL), Items (what to run; only what those models have is listed) and the speed (SLOW / NORMAL / FAST). With two or more fixtures you also choose how to show it: TOGETHER, all at once, or ONE BY ONE. The number of fixtures and the time it takes read like 24 FIXTURES · 4:32.START TEST asks first, noting that moving heads swing to the ends of their pan and tilt. Press START TEST again to begin.| Kind | What it runs |
|---|---|
| SIMPLE | Color temperature, Green / Magenta, color (RGB or other mixing; the color wheel if there is no mixing) and pixels |
| FULL | Whatever the model has of the items listed below the table |
Notes on the table:
Everything outside the step being tested is set to open white: the shutter open, wheels on open or white, built-in effects on no effect. Values that are commands, such as a reset, are never sent. Control channels such as the lamp and the fans are not touched.
What each step does:
› goes on to the next.Items. It flashes at 1, 2, 5.5, 11 and 22 Hz for 2 seconds each. 22 Hz shows WIRE LIMIT: Kanau sends 44 times a second, so it cannot send a faster flash.When the fixtures include ones with lamps, STRIKE LAMP shows at the very top of the test screen. Press it to send the lamp-on command to one fixture at a time, for the number of seconds in the data (5 seconds if there is none). Check by eye whether the lamps came on. There is no key to turn the lamps off.
During the test, everything below the status line becomes the test screen. The status line, with GM and the rest, stays in view.
‹ / › go back or forward one item within the step, and « BACK STEP / NEXT STEP » below them go back or forward a whole step. PAUSE (which becomes RESUME) and EXIT are there too.When it ends it stops on open white and shows DONE. EXIT brings back the light from before the test.
Pan, tilt, zoom, iris, frost and gobo on moving lights.
Hold a fixture's round icon to open its panel, then switch to MOVE at the top. The MOVE tab is there whenever the selection holds a fixture with head or optics rows. The tab you left open is the one that opens next time.
A fixture with only strobe or effect channels has no MOVE. Its rows are under Channels (chapter 06), on the LIGHT tab.
At the top of MOVE is a button for each section the selected fixtures have. Each is one of POSITION, GOBO, BEAM, FOCUS and SHAPERS. Tap one and only that section is shown below.
The section you last opened is remembered, and MOVE opens on it next time. When there is only one section, these buttons are not shown.
The next row under the section buttons holds FINE, DMX and %, from the left. They are the same size as the section buttons. These three are shown even when there is only one section. Everything down to here stays in place when you scroll the rows below.
MOVE works on everything you have selected. Where the whole selection shares a value, the row shows it, and where they differ it reads —.
DMX and % switch between the raw DMX number and the fixture's own units. It is the same switch as the one under Channels and in DMX Monitor, so the whole console follows it. On DMX a field reads 0–255, or 0–65535 where the row is 16-bit.
Tap FINE, at the left of the row under the section buttons, to move values in small amounts.
What you see is the value actually sent. FINE is the same as FINE on Home (chapter 04). Leave it on and go back to Home, and the faders stay fine too.
How Pan and Tilt read depends on the fixture data.
On a 16-bit fixture, coarse and fine sit on one row. Work a row as follows.
With more than one fixture selected and their values different, the slider and the step keys move them all by the same amount. The gaps between them are kept, and the ones that reach an end stop there while the rest carry on. Typing a value, Home, and picking from a list put every fixture on the same value.
FAN sits on the Pan and Tilt rows whenever more than one fixture is selected. Turn it on and the slider sets how far the fixtures fan out: the middle stays where it is and the two ends open out by the same amount, reading ±n°. Turn it off and the slider goes back to moving them together.
Invert Pan and Invert Tilt reverse the direction of Move effects on this fixture only; the slider and the angle it shows are not reversed. On a locked fixture both are dimmed and cannot be switched.
Dead ranges, where the DMX value does nothing, are skipped by both the slider and the steps. On a fixture whose default sits inside a dead range, the steps will not move: use the slider or type a value to get into the live range first.
Position is recorded in HISTORY. Whether it also goes into the current Scene follows chapter 08.
A Scene fade moves Pan, Tilt and the optics. They travel over the fade time the same way intensity does. What still switches the moment you recall is the values you choose rather than dial — gobo, prism, an animation wheel — and anything set in seconds or hertz. Chapter 08 has the list.
The sections in MOVE are POSITION, GOBO, BEAM, FOCUS and SHAPERS. How you work a row depends on the kind of value.
A continuous value such as zoom or frost is one row, even when the models differ.
1 of 4 at end.These stay as rows for each model and mode.
DMX is selectedHome beside a row sends that one channel to the fixture's own start position. Anything outside these sections is under Channels (chapter 06).
To animate any of it, use Move and Beam in the EFFECT panel. Move works around wherever the head is pointing now, and layers on top of intensity effects.
Each section — Position, Gobo, Beam, Focus and Shapers — carries its own row of saved values under its heading, each under a name, with SAVE at the end of the row. Each saved name holds its own value for each fixture, not one value shared by all of them.
POSITION 1.SAVE is only there while the selection holds a fixture with rows in that section.
Tapping a name puts the stored values back. They go to the following.
A fixture that was not saved under it is left alone. So is one now in a different DMX mode from the one it was saved in.
Hold a name for Rename, Update — which writes what is set now into it — and Delete.
Values saved under a name belong to the show, not to a Scene. Tapping one puts the values there at once; store them in a Scene if you want them to travel over a fade time.
↑ ContentsA Scene is a stored look. Open Scenes, tap SAVE to store, tap a row to bring it back.
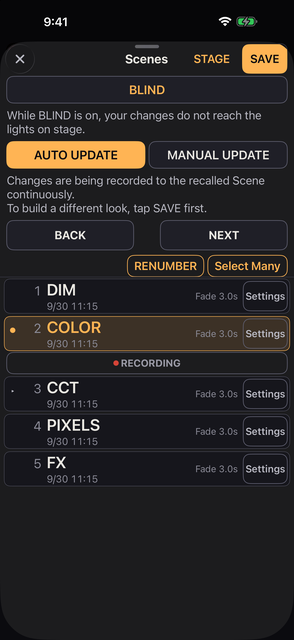
The Settings here is the one inside the Scene's row. It is not the Settings tab at the bottom of the screen.
SAVE names a new Scene with the whole number after the last numbered one in the list: after 1, 1.1 and 2 it is 3, and with none it is 1. A name is 8 characters at most; a number at its start, such as 12 or 1.25 followed by a space, does not count toward the 8.
Under AUTO UPDATE, the starting setting, whatever you touch after recalling a Scene is written into that Scene at once.
Two buttons at the top of Scenes decide this. A line under them says what the one you picked does.
Until a Scene has been recalled or stored with SAVE, nothing is recorded, and the line says so. The same applies when the recalled Scene is locked.
The choice is kept in the show file rather than on the phone, so a finished show opens the way you left it.
| Button | What happens once you have recalled a Scene |
|---|---|
| AUTO UPDATE | Everything you then do to the light is recorded into that Scene as you lift your finger. There is nothing to press |
| MANUAL UPDATE | Nothing is recorded until you tap UPDATE. Recalling another Scene throws away what you have not recorded, and does not ask |
Switching between the two records nothing by itself. Going from MANUAL UPDATE to AUTO UPDATE does not write what is already waiting; AUTO UPDATE starts from your next move.
Under the current Scene's row, a strip says which of these is happening. The strip stays in the same position, and its label and appearance show whether UPDATE can be pressed.
| Strip | When | Tap |
|---|---|---|
| LOCKED, green | The Scene is locked, under either button | No |
| ● RECORDING, the dot red and breathing | AUTO UPDATE, not locked | No. It is saying that what you do now is going in |
| UPDATE, dim | MANUAL UPDATE, nothing differs from the recall | No |
| UPDATE, bright and blinking | MANUAL UPDATE, something differs | Yes. Records the current state |
Under MANUAL UPDATE, UPDATE lights only when something differs from the moment of the recall, or of storing it with SAVE.
What a Scene has recorded is not part of HISTORY.
A recall never moves GM, B.O. or ⏻. A Scene does not store them, so a recall cannot raise the grand master, clear a blackout or turn a fixture back on.
There is no way to read what a Scene has stored before you recall it. Its Settings hold the name, the Delay, the fade time, the Curve, Fixture Times, the lock and Delete, and nothing else.
Stepping back repairs a recall; it does not stand in for checking first. The recall counts as one step in HISTORY, and stepping back restores what was there before — only locks are never undone (chapter 10) — but by then the light has already moved, on stage as well as on screen.
Only Fixture Lock or FREE keeps a fixture out of a recall, and a Scene never changes either one (chapter 10 and FREE below). How fast a change is seen depends on what it is: the Fade section below says which values travel over the fade time and which switch at once.
| Action or mark | What it does |
|---|---|
| Tap a row | Recalls when you lift your finger. While Select Many is on, it selects the row instead |
| NEXT / BACK | The next or previous Scene. It wraps around. Unavailable with only one Scene (see below the table) |
| ● and an amber background | The current Scene |
| ▸ | The Scene NEXT will bring up. Shown only while a Scene is current |
| LOCKED and a green edge | Locked against recording |
| Settings | Name, Delay, fade time, Curve, Fixture Times, lock, delete |
| STAGE | Opens the full-screen page for sending Scenes on the night. Shown only with two or more Scenes |
| Select Many | At the right edge, under BACK / NEXT. Reorder, and select rows for Copy or Delete (see below the table) |
| RENUMBER | Just left of Select Many. Asks Renumber Scenes?, then with Renumber All numbers every Scene 1, 2, 3 and so on in list order. Not shown while BLIND is on, nor to a guest |
| Copy | Copies each selected Scene to just after itself and any copies already made from it |
| Delete | Asks first. Copy does not, because nothing is lost. A deleted Scene's MIDI Note goes with it |
Notes on the table:
Each row of the list shows these.
While a Scene is coming in, a bar under its row moves. It runs pale through the Delay, then amber over the fade, moving along the Scene's Curve. The fade time at the right counts down what is left in tenths of a second.
On iPad the row of buttons along the bottom of Home ends with the Scenes. With no Scene yet it is an empty gray strip that reads Scenes you save will appear here.
| Part | What it does |
|---|---|
| Lock key | Locks the row again |
| Name | The current Scene's name, with NEXT → and the next one under it. What it shows during a fade is below the table |
| BACK / NEXT | The same as BACK / NEXT in the Scenes panel |
| UPDATE | Reads LOCKED, RECORDING or UPDATE, like the strip under the current Scene's row (see below the table) |
Notes on the table:
The row is locked each time Kanau opens, with a cover over it from the key to UPDATE. Touching the covered row only shakes it.
Strap Lock locks it as well, and unlocking Strap Lock leaves it locked.
A copy is named after its source's number with one more decimal.
A copy keeps the contents, the Delay, the fade time, the Curve and Fixture Times. It is never locked, even when the one it came from is.
The copies become the selected rows, so pressing Copy again copies the copies.
RENUMBER changes names only. The number goes in front of the name.
The order, the current Scene and what is recorded stay as they are. The old numbers cannot be brought back, and HISTORY does not hold them.
Tap Play in the tabs at the bottom, then PLAY in the list that opens. No panel opens: the bottom row becomes the Play row, and Home stays in view. The current Scene's number and name sit at the top left of the row (the name in amber, or the mark — with nothing recalled), with low EXIT and UPDATE buttons under them. A thin line along the top of the row follows the fade.
| Button | What it does |
|---|---|
| EXIT | Puts the usual buttons back |
| UPDATE | The same as UPDATE under the current Scene's row. Under AUTO UPDATE it reads ● RECORDING. While BLIND is on, it records the BLIND look |
| BACK / NEXT | The previous or next Scene, as in Scenes |
BACK and NEXT only vibrate, and the Scene does not move, while you hold a fader, when there is only one Scene, and on a guest that can only watch. On iPad the Play list has no PLAY; the Scenes in the row along the bottom of Home do the same job.
Tap Play in the tabs at the bottom, then COMMAND in the list that opens, and the command entry panel opens. On iPad it is in the Play list in the column on the left. A guest that is not allowed to control has no COMMAND.
Type fixture numbers to select fixtures or set their intensity and color temperature. However many fixtures there are, picking them takes the same few keys.
What you type shows at the top. The line under it says what ENTER will do, such as 4 fixtures → 50%. ENTER carries it out.
Each ENTER is one step in HISTORY.
The keys are in 5 columns, based on the grandMA3 layout.
COLOR, EFFECT, ZEN, (empty), ⌫GROUP, 7, 8, 9, +SCENE, 4, 5, 6, THRUFIXTURE, 1, 2, 3, −0, ., K, ATSTORE, ENTER (two keys wide), CLEAR, FULLKeys that pick fixtures (GROUP, FIXTURE, THRU, +, −) are amber; keys for values and actions are light blue. ⌫ removes one key. CLEAR clears what you typed and the fixture selection; it does not change any intensity.
The SELECTED line under what you type shows the current selection, written the way you would type it, such as 1 THRU 10 + 15 · 11 fixtures. With nothing selected it shows —.
Every number is a fixture number (the Fixture Number, chapter 03). FIXTURE can be left out: FIXTURE 5 and 5 are the same.
100.3 is pixel 3 of fixture 100, counting pixels in the order they appear on screen.
Type only numbers and press ENTER, and the fixtures are selected, nothing more. COLOR, EFFECT and the rest then work on them as usual.
| Type | Selects |
|---|---|
5 / 1 + 3 + 7 | Fixture 5 / fixtures 1, 3 and 7 |
1 THRU 50 / 50 THRU 1 | Fixtures 1 to 50. Typed backwards, the order is reversed, and so is the direction values are spread in |
1 THRU 50 − 25 | 1 to 50 without 25 |
100.1 THRU 100.8 | Pixels 1 to 8 of fixture 100 |
100.5 THRU 102.3 | From pixel 5 of fixture 100 to pixel 3 of fixture 102, across fixtures |
100 − 100.3 | Every pixel of fixture 100 except pixel 3 |
GROUP 2 / GROUP 2 + 5 | The group whose name starts with 2 (chapter 03) / that group plus fixture 5 |
+ 9 / − 9 | Adds fixture 9 to the current selection / removes it |
GROUP 1 THRU 3 | Groups 1 to 3 together, in the order typed. − takes fixtures out |
. 3 / . 1 THRU 4 | Pixel 3 / pixels 1 to 4 of each fixture selected now. Select the fixtures first. 1 THRU 10 . 3 reads as 10.3, pixel 3 of fixture 10 |
| Type | What happens |
|---|---|
1 THRU 10 AT 50 | Sets them to 50% |
AT 50 | Sets the selected fixtures to 50% |
. 2 AT 50 | Sets pixel 2 of each selected fixture to 50% |
AT + 10 / AT − 20 | Raises them by 10 / lowers them by 20, each from its own level |
1 THRU 10 AT 0 THRU 100 | Spreads 0 to 100 across them in the order typed |
1 THRU 5 AT 0 THRU 100 THRU 0 | THRU can go on as many times as you like. Values are spread in straight lines between the ones typed, so this gives 0, 50, 100, 50, 0 |
FULL / AT FULL | Sets 100% |
AT 5600 K | Sets the color temperature to 5600 K |
AT 2700 THRU 6500 K | Spreads color temperature from 2700 K to 6500 K. One K at the end is enough |
1 THRU 20 COLOR | Selects them and opens the COLOR panel. EFFECT and ZEN work the same way. Adding AT, as in 1 + 2 + 3 AT EFFECT, does the same |
1 THRU 50 STORE GROUP 4 | Makes group 4 from them. STORE GROUP alone uses the next free number. An existing number is never written over |
SCENE 5 / SCENE 1.1 | Recalls the Scene with that number |
After an ENTER that sends a value (AT 50, FULL, AT + 10, AT 5600 K and so on) and after STORE GROUP, the selection is cleared. An ENTER that only selects, and opening COLOR, EFFECT or ZEN, keep it.
| Shows | Meaning |
|---|---|
| 4 fixtures → 50% | Four fixtures will go to 50% |
| Incomplete | The line is not finished |
| Out of range | An intensity outside 0 to 100, such as AT 500. It is not turned into 100 |
| Not found: 999 | There is no fixture with that number |
| 2 locked | Two locked fixtures will not move |
| 2 no CCT | Two fixtures have no color temperature and will not move |
| 2 no px | A pixel number was typed for fixtures without pixels |
| Group 4 exists | Group 4 is already there, so nothing is made |
| Not on this device | It does not work on this device |
STORE GROUP and SCENE do not work.STORE GROUP does not work.Under AUTO UPDATE a Scene changes as you work. REVERT puts it back to how it was when you recalled it, or stored it with SAVE.
REVERT appears beside RECORDING or UPDATE, under the current Scene's row.The Scene's look goes back, and the light then fades to it over the Scene's fade, as a recall does. GM, B.O. and ⏻ do not move, and neither do locked fixtures. The name, the times, the Curve, Fixture Times and the lock stay as they are.
A FREE fixture is skipped by Scene recalls: the list, NEXT, BACK, STAGE, Play and MIDI leave it where it is, during a fade as well. Faders, the piano and HISTORY still move it, and GM, B.O. and BATTERY SAVE still apply.
A FREE fixture carries an F on its round icon, and now and then the status line shows the count, such as FREE ×3. A fixture is FREE or locked, never both. AUTO UPDATE and UPDATE leave a FREE fixture's stored value in the Scene as it was; SAVE stores its present value in the new Scene. The FREE master on the GM panel scales all FREE fixtures together (chapter 04).
STAGE is a full-screen page for sending Scenes during the show, on a black background.
| Part | What it does |
|---|---|
| Settings mark, top right | Opens STAGE settings, described under this table |
| ×, top left | Leaves STAGE and returns to Scenes |
| The name above NEXT | The current Scene, written large, with an amber ● at its left while a Scene is current. Until a Scene is recalled it reads — |
| NEXT and BACK | The two large buttons. Each shows the name and fade time of the Scene it goes to (see below the table) |
Notes on the table:
You can see where each goes before you press it.
The mark at the top right opens STAGE settings, with Done at its top right. Buttons chooses one of these.
The choice is kept on this device, and BACK + NEXT is the default.
The Scene goes out when you lift your finger, so sliding off a button before you let go sends nothing.
BLIND, the wide button under the title of Scenes, starts a copy of the console whose changes do not reach the lights. A line under it says what it does. While BLIND is on, the button is amber with a light running along it.
The copy starts from the faders, colors and effects as they are, or from where a running fade is heading. The lights keep doing what they were doing.
The band at the top, the edge of the screen and each panel are marked in amber. Nothing you do in BLIND goes into HISTORY.
| While BLIND is on | What |
|---|---|
| Change the copy only | Faders, color, effects, Scene recalls |
| Still act on the lights | GM, B.O. |
| Record | SAVE stores the BLIND look as a new Scene; UPDATE writes it into the current one (see below the table) |
| Closed | Patch, Output, Session, Shows, HISTORY, Scene settings. In a fixture's panel the name cannot be typed and Label Color, BATTERY SAVE, Invert and Switch are hidden |
| Open, and real | REORDER on Home. It changes the order of the show itself, not only of the copy, and its move is a step in HISTORY |
Notes on the table:
To leave, tap BLIND again, or BLIND at the top left of the screen. With unsaved changes it asks Update, Save New, Discard or Cancel. Leaving never changes the lights. A guest in a session has no BLIND.
Turn on Lock This Scene for Scenes you want left alone. You can still recall them and still work the light, but nothing is recorded. LOCKED is shown on every locked row, not only on the current one.
Lock is stronger than either AUTO UPDATE or MANUAL UPDATE. A locked Scene never says RECORDING.
This is not the same as Fixture Lock. Scene Lock protects what is stored; Fixture Lock holds the output.
A Scene stores intensities, colors, positions and effects. It does not store the grand master, B.O. or ⏻. The table below says exactly what.
| Stored and brought back | Not stored |
|---|---|
| Intensity, CCT, G/M, crossfade, RGB, emitters, the name of the gel picked from a table | GM and B.O. |
| Raw channels such as position and gobo, cell color and intensity, effects | ⏻ state, BATTERY SAVE, Power Switch |
| Color groups | Limits, Fixture Lock, FREE, group masters |
Locks and limits belong to the console, not to a Scene. A Scene does not record them and a recall does not apply them.
Set the fade time per Scene, in the Scene's Settings → Fade. 3 seconds is the default.
The Scene's Settings open over the whole screen, with × at the top left. These are the parts that set the fade.
Settings → Settings → Fade Times → Scene Curve sets the Curve for every Scene at once, and for Scenes saved from now on.
These values travel over the fade time.
They follow the Scene's Curve. Hue goes the short way round the circle. The faders move with them.
What you touch partway through a fade — with a fader, ⏻, color or a MIDI knob, or from a guest in a session — leaves the fade and stays where you put it, while the fixture's other values carry on; just taking hold of a fader is enough. Under AUTO UPDATE what you touched goes into the Scene the fade is heading for at once; under MANUAL UPDATE, UPDATE lights.
A piano key or FLASH gives its value while held and is not recorded; let go and the fixture stops at the value it had before you pressed, then goes to the Scene's value when the fade lands. A key still held when the fade lands goes to the Scene's value when you let go.
These do not interpolate. They switch to the stored value the moment you recall, whatever the fade time says.
An effect you start, stop or change during the fade is yours and stays as you set it. If the look you are coming from holds no position at all (an older Scene, for example), the head lands on the new value at once.
Effects cross over with the fade, along the Scene's Curve.
For a fixture that has a Delay (see Fixture Times below), effects reach it when its Delay ends.
The recall itself is recorded in HISTORY as one step. Scenes are part of the show file.
Every fixture follows the Scene's Fade unless you say otherwise. Fixture Times, in the Scene's Settings below Fade, gives chosen fixtures times of their own.
This lets a look build across the stage. The section is not shown while there are no fixtures.
A fixture you have not set follows the Scene's Delay and Fade. One set to a Delay of 0 starts at the recall even when the Scene has a Delay.
Beside the heading, in amber, is the time until the last fixture has arrived: the longest Delay plus Fade among the fixtures.
A short explanation and a scale in seconds follow, then one row for each fixture, in fader order. Each row has the fixture's number in thin type, its name and a bar.
The scale is fixed by the Scene's Fade: the width you can see holds at least 5 seconds, and at least twice the Scene's Fade. Giving one fixture a long Delay or Fade does not shrink the bars of the others; only the bar of the long fixture grows. To see what runs past the edge, slide the band sideways with a finger; the scale and all the bars move together. The column of names stays still.
Drag the knob at the start of a fixture's bar to set its Delay, and the one at the end to set its Fade. The fixture then has times of its own. Touching a knob without moving it changes nothing.
Dragging the knob of a selected fixture moves every selected fixture by the same amount, keeping the differences between them. One that reaches 0 stops there while the others carry on, as faders do on Home.
A row under the explanation narrows the list and stays at the top while you scroll.
While anything is selected, a bar appears at the bottom of the panel.
Delay and Fade stay within the same range as the Scene's own Fade.
Tap the value on the Delay or Fade line to type it. The number keys open, and Return gives every selected fixture exactly that number, not a step from its own value. Something that cannot be read as a number changes nothing.
On a recall, a fixture that has a Delay stays as it was until its Delay ends, then moves over its own Fade. The Scene's effects come to each fixture at the moment it starts.
What you touch on a fixture that is still waiting leaves the fade and stays as you set it. An effect you change during the fade is not overwritten when a waiting fixture's Delay ends.
Hold a round icon, and the SETUP tab of its panel has a NEXT row under the Fade Time heading: the Delay and Fade this fixture takes into the Scene NEXT will bring up.
Blink, fire, lightning and the rest, applied to your fixtures.
EFFECT on Home is the way in. What it opens depends on whether fixtures are selected.
Holding a round icon on Home opens that fixture's own panel, and EFFECT sits there too, to the right of ZEN. It opens the effect panel for that fixture.
To choose the effect first, tap EFFECT with nothing selected, then EFFECT under Applies To in the list. Tap a name and a panel opens under it to pick its fixtures; Done starts it. Cancel, or pulling the panel down, starts nothing.
The fader still sets intensity. While an effect runs, the fixture icon and fader move with it. The EFFECT button changes as follows.
N RUNNING, such as 2 RUNNING.On a fader set as a switch, intensity effects do nothing. Color effects still change its color.
At the top of the panel, a round icon stands for each step. Each icon shows the movement it is actually making.
+. It stays dark as the chase goes past.The band above the icons shows the shape over time. It is in the effect's own color when the effect carries one, and plain when it does not.
Under the icons sit three buttons: TOGETHER, SPREAD and STEPS.
Of TOGETHER and SPREAD, the lit one shows the current state. With nothing selected, the one you press is kept for the effect you apply next.
The movement and the steps are two different settings, so two buttons can be lit at once (SPREAD over three steps, for example). RUNNER, FADE RUN and COMET always run apart.
STEPS opens the page for editing the steps. It covers every fixture running that effect, not only the ones selected. So a change to the steps keeps the whole chase in step.
Empty when there is nothing) and a SELECT of its own.+ ADD STEP: adds one step on the end.One step is the fewest there can be. One step is TOGETHER.
Tapping an empty step opens the fixture list. It is the same one the step list's SELECT opens. Whatever is already in that step is ticked.
Cancel, or pulling the panel down, leaves the step as it was.
Tap the icons to pick out fixtures. The row under them says how many are MARKED. ALL marks every one and CLEAR lets them go.
An icon marked … opens that fixture's own color and intensity panel on a hold. It is the same panel as the round icon on Home. Hold with several picked out and they open together.
| Action | What it does |
|---|---|
| BACK | Goes back one step. With TOGETHER it goes back a whole cycle |
| NEXT | Goes on one step, the same way |
| PAUSE | Freezes the movement at the current intensity and position |
| RESUME | Carries on from where it froze |
| RELEASE | Stops it and hands control back to the normal values. The settings stay in the list |
| START | Runs a released effect again from the beginning |
| CLEAR | Removes it from the list. It asks first |
BACK and NEXT are the two arrow buttons at the left of the row. They move while the effect is paused as well, so you can walk through it a step at a time. While something runs, the button at the right of the row says RELEASE. Once it is released, the same button says START, so the effect can be set going again without leaving the panel.
The panel draws the waveform in its running shape even when the effect is paused or released. So the top left of the waveform shows the state.
An effect takes 0.5 s to come in when you press it and 0.5 s to go out when you stop it. The fires take 3 s to come in and 4 s to go out. This time is used in these cases.
Recalling a Scene uses the Scene's own fade. ONE FIRE and SIGNAL switch at once.
| Item | What it is |
|---|---|
| Speed | In hertz. Decimals allowed. TAP is at the right of the reading. Not on Move, Beam or SIGNAL |
| Energy | On some kinds, one knob in place of the others. It moves Speed, Depth and the rest together |
| Depth | How far down it pulls the intensity. 100 reaches zero; 35 barely moves |
| Size | On the kinds that move the head, in place of Depth. How far it swings, in degrees per axis. FINE beside it works like FINE on Home |
| How Often | How often it happens. The same knob reads Crossing Time on PASS and Saturation on RAINBOW. Only on the kinds that use it |
| Shape | On ORBIT, EIGHT, BOX, SPIRAL and SEARCH. At 50% the shape is as drawn; lower flattens it toward a swing from side to side, higher toward up and down |
| Glide | On JUMP. At 0 it jumps at each step; higher, it travels to the next point over that share of the step |
| Roughness | How ragged the wander is, on the five fires, WATER, LANTERNS, DRIFT, HANDHELD, WIND and BALLYHOO |
| Width | How much of the rig is lit at once, for example 50% 2 / 4. On one fixture, or with TOGETHER, how long each beat stays lit |
| Tail | The length of COMET's tail |
| Random | How much the beat and the height wander. 0 keeps it regular |
| Drama | On the five fires. 0 is the real thing; higher makes it a stage fire. It is under Advanced, with the other single knobs |
Which items appear depends on the effect. SIGNAL has a panel of its own instead.
Notes on the table:
8-bit 2.1°/step under Size shows the angle of one step. The values sent do not change.BEACON R/B starts with TOGETHER, and its panel carries ROLES under Adjust. There is a button for each role, such as ● RED 2, ● BLUE 2 and ● WHITE 1, with the number of fixtures in it.
If you pick none, they split in order: half red, half blue, and lights without color go white.
Arrange holds the following, from the top.
The kinds that only move the head or the beam carry no Color Source. Under the three Color Source buttons, one line for each says what it means, and the one you have chosen is shown bright. So you can tell before pressing which color each will give.
With two or more fixtures, Arrange also carries Spread. It sets how far apart the fixtures run. At 0% they run together, and at 100% they are spread over the whole cycle.
0% is TOGETHER, and moving it up turns SPREAD on. The SPREAD button sets it back to 100%. Spread is on the kinds that run along the rig. It is not on the towns or SIGNAL.
The flickers (the five fires, the two FLUO, WATER, LANTERNS, TV and NEON) carry Link instead. At 0 each fixture flickers on its own. Higher lets the same flicker travel along the order, so that neighbors look alike. 100 makes them one, and on a fire 100 is ONE FIRE.
| Color | What it does |
|---|---|
| AUTO | The effect decides. The ones that carry no color of their own leave yours alone |
| COLOR | It runs in the colors you set below. A color appears even on the kinds that have none |
| KEEP | Only the brightness moves. The color stays as you set it on the fader |
| Arrangement | What it does |
|---|---|
| IN ORDER | Evenly staggered by number |
| ALTERNATE | Odd and even, half a cycle apart |
| WINGS | Mirrored out from the center. On a moving head the back half also turns Pan the other way, so the two sides swing in and out together |
| RANDOM | In a random order |
| BOUNCE | Turns around at each end |
| BUILD | Lights one at a time, then clears them all together |
| SPELLER | Lights one at a time, and once they are all on, everything flashes together three times |
| PASS | Like IN ORDER, but fast through the middle and slow at the ends, the way a car goes past |
BOUNCE, BUILD and SPELLER are not offered on Move, Beam or RAINBOW.
Some kinds put a button in Arrange that only works while you hold it.
With a fire on two or more fixtures, Arrange also carries ONE FIRE. With it on, the fixtures burn as one big flame. Its rise and fall reaches each fixture a little later along their order, while each keeps its own flicker. Turning ONE FIRE on turns TOGETHER off.
CYCLE, on IN ORDER, BOUNCE, BUILD and PASS, is how many steps one cycle spans. Leave it empty to run one cycle across the whole selection. A number in CYCLE wins over Runs, and pressing Runs empties it. It is not shown once the steps are set by hand.
Runs, on the same four, is how many patterns run at once, set with − n +. It will not go past the number of fixtures you have selected.
On PASS, Curve sets how much it slows at the ends. At 0% it moves as evenly as IN ORDER.
Direction is FORWARD or REVERSE.
The STEPS row in Arrange shows how many steps the chase is running over, and how your fixtures or pixels are dealt into them. With more fixtures than steps, a step holds several. With more steps than fixtures, the spare ones stay dark. Press STEPS above to change how many there are, and which fixture sits in which.
INVERT and REPEAT sit under Options, below Arrange.
INVERT swaps the lit and the dark. One step lighting up becomes one step going out, and a chase that fills becomes one that empties.
With REPEAT on, the effect keeps going round. With it off, the effect runs once and holds its last look; press the effect again to run from the start. The five fires have no REPEAT; they always keep burning.
The arrangement, CYCLE, Runs, STEPS and Direction only appear while SPREAD is on, and only on the kinds that run along the rig. INVERT and REPEAT sit outside that: REPEAT is on every kind but the five fires, and INVERT on every kind but RAINBOW.
Both work with TOGETHER as well. Invert a blink set to 20% width and you get a short dip in an otherwise bright look. Invert STROBE and you get short blackouts inside the light. Turn REPEAT off and you get one flash that holds where it ends.
Every effect carries an Advanced section below Options. Its heading is amber, because it opens. It stays folded until you open it, and the folded heading says EDITED once you have changed something. Each block in it has a RESET of its own, which returns that block only to its starting values and leaves everything else alone.
| Block | On | What you change |
|---|---|---|
| Colors | Beacons, PACHINKO, FIREWORKS, the towns, LIGHTNING, and any kind set to COLOR in Arrange | Each lamp or flash, by name: RED, BLUE, AMBER and the rest |
| Tube | FLUO FLICKER, FLUO RESTART | MONO or COLOR, and the color of a healthy tube |
| Temperature | The five fires | LOW and HIGH in kelvin at full fader, in steps of 50 |
| MAX | The five fires | How strongly FLARE and WIND act. 10 to 100%, in steps of 10 |
Notes on the table:
This is where you change a fire's own color, because on AUTO it works that color out from its temperature.
Tap a button under Colors to open a page for choosing its color.
A button you have changed carries an amber dot. DEFAULT at the top of its page puts that one back, and RESET for Colors puts them all back.
The four towns differ in character, and each has moments of its own that come now and then. Speed on the towns goes up to 3 Hz.
| Town | What it does |
|---|---|
| TOKYO | Many colors, moving fast. Now and then every sign cuts to one color, or the screens flash white |
| OSAKA | Strong primaries, switching hard. Now and then every sign blinks three times |
| KYOTO | Warm and muted. Lanterns, moving slowly. A breeze passes along the row, and now and then someone walks past a light |
| NARA | The dimmest. Stone lanterns, barely moving. Now and then a cloud dims them all, or one lantern is relit |
Each time you apply a town it is a different night. Stop it and press it again, or apply it from the Saved row, and the time of the special moments, the colors it switches to, the order of the people and fires and the colors the signs drift to all come out differently. The town's character stays the same. A Scene remembers the night it was stored with, and recalling it from a different look starts that same night from the beginning.
Applies To → FIXTURES picks fixtures and groups. The selection is shared with Home, and the list stays open while you choose. A model opens into its fixtures, and a fixture with pixels opens again into ALL PIXELS and P1 … Pn.
A fixture goes in whole or by pixel, not both. If both end up chosen, the pixels stay and the whole fixture is let go.
When you select a pixel fixture itself and apply an effect, how it is applied depends on PIXELS on Home.
16 selected.An effect that is already running keeps the unit it was applied with when you adjust it, whichever way PIXELS is set.
SAVE, at the top right of the panel, stores the settings you have dialed in, under a name. It is always there. When there is nothing to store, it is dimmed and pressing it stores nothing. That is when nothing is running on the selected fixtures, or when different effects are.
The Saved row appears once a setting is stored. It also says why when the effects are mixed or the stored settings cannot be read.
The fixtures are not part of a stored setting.
Select the fixtures already running along with the new ones, pick the same effect, and the speed, depth and phase carry over. Where the settings differ, the effect falls back to the defaults. To release just one fixture, select only that one and tap RELEASE.
| What you want | Try |
|---|---|
| Natural light | CANDLE, TORCH, FIREPLACE, CAMPFIRE, BONFIRE, LIGHTNING, WATER, TV |
| Light running along the rig | RUNNER, FADE RUN, COMET |
| City light | NEON, SIGNAL, TOKYO, OSAKA, KYOTO, NARA, PACHINKO |
| Beacons | BEACON R/B, BEACON BLUE, BEACON RED, BEACON AMBER |
| Press cameras | PAPARAZZI |
| Plain flashing | BLINK, STROBE, PULSE, DOUBLE, JITTER, SPARKLE, RARE FLASH |
| Color on the move | RAINBOW |
| A failing fluorescent | FLUO FLICKER, FLUO RESTART |
| Moving the head | The Move group, WIND among them |
| Moving zoom or gobo | The Beam group |
| An old sign | Marquee |
PAPARAZZI is camera flashes from a crowd. Each fixture fires on its own and stays dark in between, so the more fixtures you give it the less it looks like a pattern. How Often sets how many go off.
There are five fires. The four other than CANDLE are wood fires.
Speed goes up to 2.4 Hz on TORCH, 2.2 Hz on FIREPLACE, and 2.5 Hz on CAMPFIRE and BONFIRE. A fire rises from embers when it starts. When it stops, it sinks back to embers before it hands over to the plain light.
Drama sits under Advanced on every fire and starts at 0. 0 is the real thing. Raise it and the fire becomes a stage fire: it stops going still, it reddens as it drops, and it flickers more than a real one would.
The fires take Color Source in Arrange like any other effect.
The further you pull the fader below half, the more the fire sinks toward the red of embers. When the light drops, the temperature does not drop at once. Each light runs a slightly different color.
On COLOR, each time the fire sinks, your color leans toward its red side. A fire whose LOW and HIGH you have changed never leaves that range.
On AUTO, a fire whose fixtures carry both a color temperature channel and color of their own gets AUTO, CCT and RGB to choose between. Where a fixture has only one of the two, the choice does not appear. CCT and RGB do not reach the same color.
There are two tubes. Both carry a faint shimmer.
| Group | Effects |
|---|---|
| Basic | BLINK, STROBE, PULSE, DOUBLE, JITTER, SPARKLE, RARE FLASH, RUNNER, FADE RUN, COMET, DRAW |
| Lights | CANDLE, TORCH, FIREPLACE, CAMPFIRE, BONFIRE, FLUO FLICKER, FLUO RESTART, LIGHTNING, PAPARAZZI, TV, NEON, SIGNAL |
| Places | BEACON R/B, BEACON BLUE, BEACON RED, BEACON AMBER, TOKYO, OSAKA, KYOTO, NARA, PACHINKO, WATER, FIREWORKS, LANTERNS, RAINBOW |
| Move | DRIFT, PASS, ORBIT, EIGHT, BOX, SPIRAL, SEARCH, NOD, SWEEP, LIGHTHOUSE, BREATHE, HANDHELD, WIND, JUMP, BALLYHOO |
| Beam | ZOOM PULSE, ZOOM BREATHE, IRIS PULSE, FROST BREATHE, GOBO SHAKE |
In the Lights part of the effect list, the five fires come first as one block. Under them, one line describes the fire you have chosen (CANDLE, for example, is a quiet candle in still air).
RUNNER, FADE RUN and COMET need several fixtures, or pixels. Move and Beam appear when the selected fixtures support them.
Beside the name of an effect that changes color are up to four small swatches of the colors it runs, such as red and blue on BEACON R/B. An effect without them uses the color you set by hand.
Of the Move kinds, these move as follows.
DRAW is a shape you draw yourself, for brightness. Its panel shows the shape with DRAW under it; DRAW opens a page to draw on, with Cancel and Done. A wide board sits under an overview of one whole cycle, every peak joined, with a mark moving where it is playing now.
PEAKS 1 to 4 sets how many peaks there are, and each peak is drawn in a shape of its own. Tap a section of the overview to spread that peak across the board; ALL lets you draw every peak in one stroke (only the peaks your finger crosses for at least a quarter of their section are rewritten). Draw from left to right: higher is brighter. Kanau joins the peaks so there is no step between them.
SMOOTH evens out the shake in your finger; SHARP keeps the corners and draws the sides straight. RANDOM, with two or more peaks, plays the peaks in a new order every round, never the same peak twice in a row, with an order of its own on each light. Speed is the speed of one peak, so four peaks make a cycle four times as long. With two or more peaks, BOUNCE, BUILD and SPELLER are not offered.
A stroke that covers less than a quarter of the width is refused, and the line before it stays. Until you draw, the shape is a soft rise and fall. Nothing is kept until Done. A setting stored in Saved keeps the line too.
SIGNAL is a crossing. Tapping its name opens a panel of its own instead of applying anything.
A crossing has two roads, and each road carries a light for its cars and one for the people walking alongside it. The people get their green together with those cars. The four signals are CAR · ROAD 1, WALK · ROAD 1, CAR · ROAD 2 and WALK · ROAD 2.
Each signal is a card. Inside it sits a round icon for the whole signal, marked ALL, and beside it the lamps in a housing of their own — G Y R for the cars, R G for the people, in the order the chosen country hangs them. An empty circle carries +, and the number of fixtures in the signal is under the name.
To fill a signal:
Tapping a circle with nothing selected opens the same panel to choose from. Which fixtures a circle takes depends on the circle.
A fixture picked for more than one lamp has its pixels divided between them. Pixels you placed by hand stay where you put them. Such a fixture is listed, ticked, in each lamp's panel. Untick it to take it out of that lamp only.
One light source cannot be in more than one lamp at once.
The two lines at the top say where the crossing stands — ⏸ WAITING · CAR · ROAD 1 · GREEN, with what NEXT will reach underneath and a bar for the run to it. While it runs the first word is RUNNING; between two stops, CHANGING.
| Button | What it does |
|---|---|
| PLAY | Runs from where it is. Without REPEAT it stops at the head of the cycle, where ROAD 1 gets its green |
| PAUSE | Holds where it is, mid-phase if need be |
| BACK | Goes to the previous change |
| NEXT | Goes to the next change |
| REPEAT | Keeps the cycle running by itself |
A change is the moment a signal comes to a lamp it can stay on. It counts for a signal that has fixtures in it and whose button is lit under NEXT STOPS AT. Yellow, and red with yellow, are passed through. With people lights, their green and their flashing green are changes too.
NEXT STOPS AT is the row just above BACK and NEXT, with four buttons: CAR 1, WALK 1, CAR 2 and WALK 2. All four are lit at first.
Below the buttons sit the country and Advanced. A button beside Advanced chooses the signal you are editing. Advanced holds the following.
− 40s +.One cycle stays 90 seconds. What you add to one phase comes out of the longest one.
SIGNAL 1 ▾ at the top switches between crossings and + NEW adds one. Each crossing keeps its own clock, country and signals.
Opening SIGNAL with fixtures that are in no crossing yet takes you to an empty crossing, and makes a new one when none is empty. Fixtures already in a crossing open that crossing.
Back in the EFFECT panel, when every selected fixture is in a crossing, the top of the panel shows that crossing's two lines. The row of buttons under it (BACK, NEXT, PLAY or PAUSE, and REPEAT) drives that crossing. PAUSE lights amber while the crossing runs, and REPEAT while it is on. Applying an effect takes the fixtures out of the crossing, and the top goes back to the effect.
RELEASE ALL lets go of the crossings too. Their fixtures go back to their own light, and each crossing keeps its signals and settings. START ALL starts them again from the head of the cycle. A crossing holding a locked fixture stays on, even after RELEASE ALL.
Marquee is a row of buttons in the panel, just under Basic. They are the shapes an old bulb sign ran, under the names the signs used. Pressing one sets the shape and the arrangement together. From there you adjust it with the same knobs as every other effect.
The number of steps does not depend on which button you press. Pressing one gives you a step for each light source you have selected. For the dark gaps of a real sign, add steps with + at the head of the icon row.
The color arrives as COLOR, set to the warm glow of old tungsten. KEEP runs it in the color you made on the fader instead.
| Pattern | What it does |
|---|---|
| CHASE | One bulb runs along the sign |
| DARK CHASE | All lit but one, and the dark one runs |
| CRAWL | Two side by side run together |
| BOUNCE | Runs to the end and comes back the way it came |
| BUILD | Lights one by one, then all clear together |
| FILL | Fills from the front, then empties from the front |
| FLIP FLOP | Odd and even take turns |
| FLASH | All on, all off |
| TWINKLE | Each bulb blinks on its own |
| SPELLER | Spells out, then flashes three times |
DARK CHASE is CHASE with INVERT on, and FILL is BUILD with INVERT on. The same switch turns any of the running shapes inside out.
Speed is in hertz, as everywhere else. Depth is how dark an unlit step goes: below 100 it keeps a little glow, like a filament cooling. Direction, BACK and NEXT work as they do on the rest.
One fixture can carry a LIGHT effect for intensity and color, a MOVE effect for the head, and a BEAM effect at once. Choosing another effect in the same lane replaces it. Cells take LIGHT only. On a fixture whose second light source has its own dimmer, such as the Aura ring of a MAC Aura XIP, LIGHT moves the main light only.
Opening the panel shows the first running lane, in the order LIGHT, MOVE, BEAM.
Tap EFFECT on Home with nothing selected. The list opens, titled Effects: Applies To and an EFFECT button at the top, then a row for each running effect. When nothing is running it reads Nothing is running.
Each row has these four buttons in fixed places.
EDIT, CLEAR and the row's chips act on that row's own lane only (the head or the intensity). So a blink and a figure-eight on one fixture stay apart.
n ∨ opens the fixture chips for that row; n ∧ folds them again.
×: the × on a chip drops that one fixture.+: adds what you have selected, a group, a model, or All.RELEASE ALL and START ALL apply to everything. Each crossing has a row of its own (SIGNAL 1, SIGNAL 2 and so on), with EDIT and CLEAR.
Effects keep counting through a blackout. Unlocked fixtures go dark and pick the movement up where it is when you clear the blackout. On a locked fixture the effect keeps running, at the intensity it had when you locked it. Fixture Lock is covered in chapter 10.
↑ ContentsWhat stops you making a mistake in the middle of a take, and what lets you undo one.
The word turns up in three places, and each protects something different.
| Name | What it protects | Where |
|---|---|---|
| Fixture Lock | The fixture's current output. Nothing you do changes the value (an effect running when you lock keeps running) | The fixture panel |
| Scene Lock | What is stored in a Scene | Settings on the Scene's row |
| SCREEN LOCK | The screen. Touches do nothing | Top of the screen, or Strap Lock |
Hold SCREEN LOCK at the top of the screen for 0.5 seconds. A short tap will not lock it.
While locked, a purple wash and hatching cover the screen. The values stay readable, and sending and fades carry on. To unlock, drag the purple slider in the middle about 82% of the way to the right. Let go early and it stays locked.
SCREEN LOCK is out of reach while a panel such as Patch is open. Strap Lock still locks over one.
Strap Lock locks the screen when the iPhone or iPad hangs upside down from a strap. Lifting the device does not unlock the screen. Slide right to unlock, as with SCREEN LOCK.
With the switch on, three buttons under it set how far the top of the device must tip below level before the screen locks: NORMAL (30°), the default, EASY (20°) and EASIEST (12°). The smaller the angle, the less tilt it takes.
It does not lock while a finger is on the screen or just after, while ZEN, STAGE or Settings is open, while the keyboard, a confirmation or a file picker is showing, or when the device lies flat. Over Patch, Scenes, the effect panels, GM, BATTERY SAVE and MOVE it does lock: the panel stays open underneath and is still there when you unlock, and it cannot be pulled down while locked.
Auto Unlock, a switch under the buttons that is off by default, changes what lifting does: with it on, the screen unlocks as soon as the device is turned upright, with no slide. It releases only a lock that Strap Lock put on, not one you set with SCREEN LOCK, and nothing happens while the device lies flat, on its side or face down.
Fixture Lock holds a fixture's output where it is. The grand master, blackout, BATTERY SAVE, MIDI, the session, TAP and changes to the patch do not change it — press blackout and a locked fixture stays lit. The count of what is still lit during a blackout is shown next to the green 🔒 at the top of the screen. A Scene recall does not change it either. Locks and limits belong to the console, and no Scene records or applies them (chapter 08).
Hold a fixture's round icon and turn on Lock under SETUP in its panel. Use it when a light must not change. An effect running when you lock keeps running, at the intensity it had then (chapter 06).
While a fixture is locked, the screen shows it like this.
A locked fixture does not go dark in normal use. To clear the lock, turn off Lock in the fixture panel. The output then returns to what Kanau is working out now, with the grand master, B.O., BATTERY SAVE and the rest applied.
The lock holds the values at the fixture's addresses and is saved with the show. A lock whose fixture has been deleted stays on those addresses. Release it with UNLOCK in DMX Monitor.
Dims only the fixtures you mark, for the waiting around between takes.
Hold it to set the brightness the fixtures keep and how long the fade takes. Brightness offers 75%, 50%, 35%, 25% and 0%, and 50% is the default. The fade is SNAP, 0.5, 1, 1.5 or 2 seconds, 1.5 by default, and starts and lands gently.
While it is on, the button, the band at the top of the screen and its edge turn green. The button now and then shows the brightness the fixtures keep, such as 50%.
While it is on, a dimmed fixture's fader fills only as high as the light really is. The part held back shows as a shadow with a green ↓. The ↓ fades in once the light has finished dropping, and disappears at once when the light starts to return.
To bring one fixture back for now, tap RELEASE in the green band just under the title of its panel. It turns into an amber RELEASED, and the fixture stays back until BATTERY SAVE is turned off.
At 0%, only the BATTERY SAVE fixtures go out. Unlike B.O., every other fixture stays lit, and no fader moves.
This dims your lights. It is not an iPhone battery setting.
Tap or hold HISTORY on Home to see the states you have been through. Choose a row to go back to it. HERE marks where you are.
At the head of the list, UNDO ↓ and REDO ↑ move HERE back or forward one step without closing the list. The arrow shows which way HERE moves. A line under them says what was undone or redone. With nowhere to go, they dim and shake.
The fade when you recall a point in the history is set by Recall Fade Time, in the HISTORY list. HISTORY, UNDO and REDO cannot be pressed with nothing to go back to, during a Scene fade, while you hold a fader, or on a guest in a session.
↑ ContentsA show holds one job: the patch, the groups, the order of the faders, the Scenes and the current look, with its Fixture Locks.
There is nothing to press. Changes are saved as you make them.
| What | When |
|---|---|
| Patch, groups, order of the faders, Scenes | As you change them |
| The current look and fixture settings | Within about two seconds of a change, and when the app goes to the background |
The next launch restores the last show as it was saved, and the Scene you had recalled.
The very last change before a quit is not guaranteed to be saved. Use Export Show File when you need a file to keep or to hand on. The shows folder can be seen in the Files app.
| Item | What it does |
|---|---|
| Current Show | Renames the show you are in |
| Versions | Earlier states of the current show. Restore goes back to one; the show as it is now is kept as a version first |
| Save As | Stores the current state as another show and carries on in the copy |
| Export Show File | Saves first, then asks what to take (see below the table). Then choose where from the share sheet |
| Import Show File | Adds a .kanau to Other Shows as a new show and asks before opening it. Your current show is untouched |
| New Show | Name it and tap Create. You get an empty show, and Patch opens |
| Other Shows | Opens a stored show. ⧉ duplicates. × moves it to Discarded, after a confirmation titled with its name |
Notes on the table:
The show you are in is named in amber beside Shows and carries a check under Current Show.
Starting a new show, or opening another, asks first. It shows Keep Show 1?, with what is in the show, and Keep, Discard or Cancel. It does not ask whether to save. Saving has already happened, so the question is whether to keep.
Versions are kept on this device. Versions appears under Current Show once there is one.
Show names follow these rules.
A .kanau that arrives by Files or AirDrop can be opened with Kanau and goes into Other Shows as a new show; while BLIND is on, it is refused with a vibration. A .kanaumidi is treated as a MIDI mapping file.
Whether it comes from Import Show File, Files or AirDrop, an imported show does not open straight away: you are asked first. What you are asked depends on the current show.
Keep Show 1? with Keep, Discard or Cancel as when you open another show.Open Show 2?. It says that Kanau's output switches to that show, and you choose Open or Cancel.Cancel keeps you in the current show with the light unchanged, and the imported show stays in Other Shows. If it arrives while a panel other than Settings is open, the question comes when you close that panel.
With nothing stored, the demo show opens. An older show that has no stored look opens with the intensity down.
If the file cannot be read you get Saved patch could not be read. Showing an empty rig; the file is left as it is., and it starts empty. The original file is kept and not overwritten.
A failed save shows Patch was not saved. in red. Chapter 14 covers what to do.
| What | Where it lives |
|---|---|
Saved effect settings | On the device, available to every show |
| Custom Fixtures | On the device. The definitions of patched fixtures are kept in the show as well |
| Stored ★ colors and temperatures | On the device. Colors per model and mode, temperatures shared |
| MIDI mapping | On the device. Exportable on its own as .kanaumidi |
| Output, Session, display settings, language | On the device. Whether output is sending is not kept: it is off at every launch |
| HISTORY | On the device, one for each show |
| Versions | On the device, beside each show. Not shown in the Files app |
| Piano + / Piano −, Strap Lock | On the device |
| Fixture Usage | On the device, for 180 days |
Device settings that travel with a show: of the device settings, these are also saved as a copy with the show.
Their real home is still this device. The copy is there for when the show is opened on another device.
When you open a show that carries a copy, and the copy differs from this device's settings, you are asked once: Use this show's settings?. Use takes the show's settings, and Keep leaves this device's as they are. Which network connection is used, Session, and whether output has been started do not travel.
This holds the following.
Fixture Usage opens from here too. A new language applies after you quit and reopen Kanau. Text size follows the iOS setting.
Fixture Usage, above About in Settings → Settings, opens a record of which fixtures were touched and when. It records fixtures moved by hand or by a Scene, and fixtures with their faders up when sending started. It does not show how long a light was on, whether it actually came on, or whether it was on site. The record stays on this device for 180 days and is not part of the show file.
At the bottom are these three.
A guest in a session does not record its own operations. The host records them as CHILD.
↑ ContentsMapping the knobs and buttons of a MIDI controller onto fixtures and controls.
Kanau is made for controllers that send absolute CC values (for example, the Behringer X-Touch Mini).
Bluetooth MIDI, inside the Inputs box just below Inputs, opens the system screen that finds Bluetooth MIDI devices and connects to them. Connected devices appear under Inputs, and are mapped with Learn like any other.
A knob follows a position on screen, not a fixture. Change page or group and its target changes with it.
Faders & Switches lists the positions in order.
A knob on a fader set as a switch switches it as it passes the middle.
Mappings made per fixture in an earlier version are not carried over; map the screen positions again.
If the knob and the value on screen disagree, nothing moves until the knob passes the value on screen. That is deliberate: it stops the level jumping.
The knob also has to pass the value again in these cases.
While a fixture is locked, its knob does not pick it up. On a guest in a session, MIDI input is off.
With MIDI Controller on, turn on Send Values Back and Kanau sends each knob's current level back to the controller. Empty positions come back as 0. With MIDI Channel on OMNI, it sends on channel 1.
Under Buttons you can map:
Scenes folds away; its heading keeps the count, with · N learned once any Scene is learned. Deleting a Scene removes its mapping. One button carries one action. Fixture Lock applies to MIDI as well.
A button action can be learned from a CC or a Program Change (PC) as well as from a Note. A CC counts as pressed when its value rises from 0, and as released when it goes back to 0. For a button that sends 127 and 0 on alternate presses, set it to momentary on the controller.
Learning a knob's CC for a button removes it from the knob, and the other way round. A Program Change has no release, so Switch N and Piano N cannot be learned from one.
While BLIND is on, MIDI changes only the copy, except GRAND MASTER and B.O., which still act on the lights.
Export and Import under MIDI Map File write and read the mapping as a .kanaumidi file, separate from the show. An invalid file is refused with This file could not be read., and the current mapping stays.
A keyboard connected to the iPhone or iPad can do the same jobs as MIDI buttons. Keyboard is in Settings → MIDI, after Buttons. It is folded as a whole too; tap its heading to open it.
The jobs are the same list as Buttons, with Switches and Scenes folded under it. The keys are kept in the MIDI mapping file.
iPhones and iPads on one show. Only the host sends DMX; the others watch, and work the same show through it once the host taps Allow.
A session lets devices on the same network drive one show. A guest sends what you do to the host. If the host stops, nothing takes over automatically. Every device in a session must run the same version of Kanau.
| Host | Guest | |
|---|---|---|
| Sending DMX | Yes | No |
| Owns the show | Yes | Borrows it |
| Changing the patch | Yes | No |
| Where a Scene is saved | The host's show | Sent to the host |
| Working the light | Yes | Once the host taps Allow |
When both touch the same fixture, the host wins. The guest sees IN USE BY and the other device's name (TAKEN when it has none).
The code appears here when this device is on Wi-Fi or a wired network. Once it is, the code appears by itself.There is no number to type: the QR code is the only way in. A code from a host on an older version is not read. Keep every device on the same version.
These messages can appear while joining.
Camera access is off. Allow it in Settings to join.: camera access is turned off.This is not a Kanau session code.: the QR code you read is not Kanau's.Looking for the host…: the guest has not reached the host yet.A guest starts out watching. Until the host taps Allow, nothing the guest touches reaches the light. During that time the status line reads WATCH ONLY, and the Session section says Waiting for the host to allow control.
Once the host taps Allow, the status line reads JOINED. Up to 8 guests can control at once.
The iPhone's own Camera app reads the code too: point it at the host's QR code and open the link it offers, and Kanau opens and joins, even if it was not running.
Joining stops this desk from sending., and Join or Cancel.Joining switches to another host.A Join box says why, and OK closes it:
| Shown | Why |
|---|---|
This code is not a Kanau session. | The link is not a Kanau session code |
This desk is hosting a session. Leave it first, then scan again. | This device is a host |
BLIND is on. Turn it off, then scan again. | BLIND is on |
LITE MODE is on. Leave it, then scan again. | LITE MODE is on |
With Hosting on, the host's Session section shows the QR code, New Devices, New Code, and Devices: one row for each guest, with its name and Pending, Can control or Watching. The heading counts how many can control, such as 2 of 8 can control.
| Control | What it does |
|---|---|
| Allow | Lets that guest work the light. A guest that has just joined is Pending, and only watches |
| Take Back | Returns it to Watching. It releases whatever it was holding |
| Remove | Drops it. It cannot join again until you tap New Code, and it sees The host removed this device. |
| New Devices | When this is off, no new guest can join, and one that tries sees The host is not accepting new devices. Guests already in stay |
| New Code | Asks first, then drops every guest and makes a new QR code. A guest with the old code sees The host's code has changed. Scan the new code. |
Once 8 guests can control, Allow is not offered.
This is for a guest the host has allowed; a guest that is watching can do none of it.
| The guest can | The host does | Each device keeps its own |
|---|---|---|
| Faders, color and gels, on fixtures and cells | Adding, removing and changing the patch, names, labels, Switch | Which group and page is showing, which tab |
| Recalling Scenes, BACK and NEXT in the Play row, SAVE to store, UPDATE into the recalled Scene, and AUTO UPDATE / MANUAL UPDATE, which is shared with the host | Reordering Scenes, deleting, renaming, fade, lock; HISTORY; BLIND | FINE, 10 / 5, PIXELS, PIANO mode |
| ⏻, GM, B.O., BATTERY SAVE with its amount and RELEASE for one fixture | Output, Shows, DMX Monitor | Display settings, language, gels, Strap Lock |
| Limits, Fixture Lock, clearing a selection, reordering the faders | Fade times, Piano + / Piano −, Power Switch | MIDI mapping, stored ★ colors |
The PIXELS and FIXTURES sections of the COLOR panel (chapter 05) appear on the host only.
Every effect action reaches the host.
| Action | From the guest |
|---|---|
| Applying an effect | Works |
| PAUSE and RESUME | Works |
| RELEASE, on the fixtures you selected | Works |
| RELEASE ALL | Works |
| EDIT, RELEASE, START, PAUSE, RESUME and CLEAR on a row of the running effects (EFFECT with nothing selected) | Works |
| Clearing a cell's effects | Works |
| SIGNAL: BACK, NEXT, PLAY, PAUSE, REPEAT, NEXT STOPS AT, Advanced, and filling the signals | Works |
| START ALL | Works |
What the guest changes appears on the guest's screen at once. If the host touches the same fixture, the host wins and the guest sees IN USE BY and the host's name. A fixture the other device is working shows a cyan edge with a name.
| Connection | State |
|---|---|
| Green | Connected to the host |
| Amber | Nothing from the host for about 3 seconds |
| Red | Nothing for about 15 seconds. The host is no longer available. appears |
If the link drops, the guest keeps showing the last state. It does not leave on its own, so use Leave Session. After reconnecting, faders are still relative.
No internet is needed. The devices must be able to reach each other on the same network. Client isolation, a firewall and similar settings can block the session even where DMX gets through.
↑ ContentsArranged by what you are seeing. Work down the list.
These are the actions that change what the lights do. Check them before you touch anything during a show.
| Action | What changes | Asks first |
|---|---|---|
| Recalling a Scene — a row, BACK / NEXT, Play, STAGE, MIDI or a key | The look, over the Scene's fade. Not GM, B.O. or ⏻ | No |
| REVERT | The current Scene, then the light, over its fade | Yes, Revert Scene? |
| Opening another show, or a new one | Everything | Yes (chapter 11) |
| Importing a show | Nothing until you open it | Yes (chapter 11) |
| Restore under Versions | The whole show | Yes |
| A row in HISTORY, UNDO, REDO | Back to that state | No |
| B.O., GM, a group master | Every fixture they cover, except locked ones | No |
| BATTERY SAVE | The marked fixtures | No |
| Unlocking a fixture | It goes to the values Kanau is working out | No |
| Turning a universe back ON | That universe starts sending again | No |
| Slide to send, Slide to stop | All output | The slide is the check |
Look at these four first.
| What you see | What to do |
|---|---|
| OUTPUT OFF / Not sent | Nothing has been sent since Kanau opened. A red Not sent means the light changed while nothing was sent. Tap it and slide (chapter 02) |
| B.O. | Tap it to clear the blackout. When GM is at 0 it also reads B.O., and a tap opens the GM panel instead |
| GM 0 | Open GM and use BACK TO 100 |
| An amber BLIND at the top left | You are in BLIND, and what you do does not reach the lights. Tap it to leave |
If it is still dark:
| What you see | What to do |
|---|---|
| Idle | Check that a network is enabled in Settings → Output |
| Blocked | Tap it to open Settings → Output, which prints a red line that names what stopped it and what to do. Follow that line |
| Blocked U1, with a universe number | Another sender is already on that universe. Tap it for Join, Send … Only or Cancel |
| No node | Tap it to open Settings → Output. Check the node's power, network, address and protocol settings |
| U1 OFF | Turn the universe back on in Output → Universes |
| A purple ⏻ or fixture icon | Turn the fixture's output back on |
| A green BATTERY SAVE, or a shadow with a green ↓ on a fader | Turn BATTERY SAVE off, or tap RELEASE in the green band of that fixture's panel |
| A low Upper Limit | Check the fixture's limits |
| ⚠ in Patch | Fix the overlapping address or the run past 512 |
| A mode that does not match | Set the same DMX mode as the fixture itself |
If Network shows No reply, check that the iPhone and the node are on the same network. If AUTO does not reach it, use UNICAST and enter the node's address. Run RESCAN after changing anything about the connection.
Check that Art-Net or sACN is turned on in the node, and check its address and its universe. For how a particular piece of gear shows this, see its own manual. Gear that does not answer polling shows 0 under Nodes Answering even while receiving.
Check that the same fixture is not being fed from both the network and Bluetooth, or from more than one console or DMX source. Look at any SHARED or Blocked message and cut the paths down to one. The same universe number on two paths is not by itself evidence that they meet (chapter 02).
Another control app, or a setting on the fixture, can also cause it.
Open Settings → Output and read it from the top. If you find the problem at one of these, you do not need to look further down.
Network Output   is the console sending at all
   ↓
Clock            is it jammed inside the phone
   ↓
Touch → DMX     is the trip from finger to packet slow
   ↓
Nodes Answering  is the network or the gear slow (round trip)
   ↓
Fixture          is the light itself slow
| What you see | What to look at |
|---|---|
| Network Output is Nothing | Destination, network, iOS permissions |
| Clock over 100 ms | The phone. Close panels, restart the app if you need to |
| Nodes answer, but a light does not respond | The address AUTO is sending to. If the node reports itself wrongly, try BROADCAST |
| Clock is fine but the round trip is long | Wi-Fi congestion, the access point, the gear, the path |
| The numbers are fine but the light lags | Smoothing on the fixture, its input path, another app driving it |
BROADCAST helps when AUTO's destination is the problem. For other causes it will not help, and may add load.
Check the fixture's limits, its Lock, and whether its output is on.
On a fixture imported from GDTF, wrong intensity or color usually means the roles are wrong. Fix them in Channel Roles. To carry the fix into fixtures you patch later, edit the definition under Custom Fixtures.
| What you see | Why, and what to do |
|---|---|
| A purple wash over the screen | SCREEN LOCK. Drag the slider in the middle to the right |
| A green 🔒 | Clear the Fixture Lock |
| COLOR is gray | Select a fixture |
| EFFECT reads N RUNNING | Nothing is selected, and effects are running. Tap it for the list of them, or select fixtures |
| PIXELS is gray | There is no pixel fixture on the page |
| HISTORY is inactive | There is nothing to go back to, a Scene is fading, you are holding a fader, or this is a guest |
| Play's BACK and NEXT only vibrate | Let go of the fader, check that there are two or more Scenes, and on a guest ask the host to tap Allow |
| The number buttons do not change intensity | Piano mode is on LOCK. Use + − |
| Home under Channels is inactive | It is already at the default |
| Home for Pan or Tilt does nothing | It needs a hold, not a tap |
| A Scene will not update | Check MANUAL UPDATE, and Lock This Scene |
| A guest has no Patch | Change the patch on the host |
| A guest cannot change anything, and the status line reads WATCH ONLY | The host taps Allow in Settings → Session |
| What you see | What to check |
|---|---|
| A different color from the one you set | Whether the Patch mode matches the fixture's own DMX mode |
| No color controls at all | Whether the fixture has color. Mixed models show only the shared items (chapter 05) |
| The color temperature stops short | You are at the edge of the fixture's range. It reads MIN or MAX |
| An imported fixture is off | Check Channel Roles (chapter 06) |
| White pulls green or magenta | Green / Magenta may not be at 0. The 0 button returns it to neutral |
Check first that the Patch mode matches the fixture's own. When that is wrong, intensity arrives as color and color arrives as position.
A definition imported from GDTF can have roles assigned differently from the real fixture. Correct them in Channel Roles (chapter 06). To carry the fix into future patches, edit the Custom Fixtures definition.
Check anything marked Imported data is not verified. against the real fixture.
AUTO UPDATE is on to begin with, so anything you do after recalling a Scene is recorded back into it (chapter 08).
Switch to MANUAL UPDATE at the top of Scenes and nothing goes in until you tap UPDATE. For Scenes you want left alone whatever the mode, turn on Lock This Scene under that Scene's Settings. You can still recall them and still work the light; nothing is recorded.
| What to check | |
|---|---|
| MANUAL UPDATE | Nothing goes in until you tap UPDATE under that row |
| Lock This Scene | Nothing is recorded while it is on, in either mode |
| You are on a guest | Reordering, deleting and renaming are the host's (chapter 13) |
| What is never stored | GM, B.O., ⏻, BATTERY SAVE, Power Switch, limits, Fixture Lock and FREE (chapter 08) |
If a Join box gives a reason, follow it (chapter 13). If Looking for the host… will not clear, check these.
The host's code has changed. Scan the new code.DMX can get through on a network where device-to-device traffic is blocked.
Check Fixture Lock. The green 🔒 n at the top counts what is still lit. Clear the lock on those fixtures.
A lock whose fixture was deleted also stays lit. Press UNLOCK on its row in DMX Monitor.
Restarting restores the last saved show and look, and the Scene you had recalled, with output off: slide to send again. The very last changes before a quit may not be there.
What your lights do after the app or the link stops depends on the node's and the fixture's own hold-last-look settings. Check the gear if you need them to hold.
Patch was not saved. means the save failed. Check the free space on the device, and if you can, write the current state out with Export Show File. Make sure the export finished before carrying on. Dismissing the warning with × does not mean the show was saved.
If a file cannot be read, open another show from Other Shows, Import a .kanau you exported earlier, or restore an earlier state under Versions. The file that could not be read is kept.
Settings → DMX Monitor shows all 512 channels of each universe. It only shows them; the one thing you can do there is UNLOCK a lock whose fixture was deleted.
↑ Contents| On screen | What it means |
|---|---|
| Fixture | A light. The unit you patch and control |
| Patch | Registering a fixture's model, mode and DMX address |
| Universe / Address | A universe, and the channel position inside it |
| Mode | The fixture's DMX mode. Must match the fixture itself |
| Fixture Number | The fixture's number, used by the number buttons, Fixture Sheet and command entry. Never empty |
| COMMAND | Command entry, opened from the Play list. Type numbers to select fixtures and set intensity |
| TEST | The mode that checks fixtures. Start it with START TEST at the bottom of SETUP in a fixture's panel, or under TEST MODE in Settings |
| Gap | Extra free channels between fixtures |
| Fixture Usage | The record of which fixtures were touched and when, kept on the device for 180 days. Opens from Settings → Settings |
| Group / All | A set of fixtures / every fixture |
| Pixel / Cell | A separately controllable part of one fixture |
| Intensity | Brightness |
| CCT | Color temperature, in kelvin |
| G/M | The green–magenta correction |
| Crossfade | The balance between the white side and the color side |
| Emitter | An LED or other light source inside the fixture |
| Channels / DMX Channels | Working one DMX channel at a time |
| Channel Roles | Which function a channel is treated as |
| GM / B.O. | Grand master / blackout |
| OUTPUT OFF / SENDING | Nothing sent since Kanau opened; slide to send / those universes going out |
| Slide to send / Slide to stop | Sliding right to start / to stop sending |
| Lock / SCREEN LOCK | Holding a fixture's DMX values at its addresses (an effect running when you lock keeps running) / stopping stray touches |
| Strap Lock | Locking the screen when the iPhone or iPad hangs upside down. Slide right to unlock |
| FINE / FINE+ | 1/10 and 1/20 of the usual sensitivity |
| PIANO | Using the number buttons to change intensity while held |
| Scene / Show | A stored look / everything for one job |
| SNAP / Fade | Immediate / over a set time |
| Delay | How long a Scene, or one fixture in it, waits after the recall before it moves |
| Play | The tab that opens a list of PLAY (on iPhone, turns the bottom row into EXIT, UPDATE, BACK and NEXT), COMMAND, ZEN, STAGE and FIXTURE SHEET |
| LIGHT / MOVE / GRADIENT / SETUP | The tabs of a fixture panel: intensity and color / position and beam / intensity and color laid across fixtures / names, Fade Time and fixture settings |
| BACK TO 100 | The button that puts a master back to 100 |
| REVERT | Returning a Scene to how it was when you recalled it |
| FREE | A fixture left where it is by Scene recalls |
| S-CURVE / EASE IN / LINEAR | How a Scene's fade moves |
| HISTORY / HERE | The list of earlier states / where you are in it |
| PAUSE / RESUME | Freezing an effect / carrying on from there |
| RELEASE / START | Stopping an effect / running an effect from the beginning. RELEASE in the green BATTERY SAVE band takes one fixture out of BATTERY SAVE for now |
| ROLES | Which lights take which color in BEACON R/B |
| BLIND | Working on a copy of the look that does not reach the lights, then storing it in a Scene |
| Switch | In a fixture's panel, turning its fader into an ON / OFF switch. In MIDI, Switch N is the ⏻ under Fader N |
| Versions | Earlier states of a show kept on this device |
| CLEAR | Clearing a selection, or removing an effect. It depends where you see it |
| Saved | Stored effect settings |
| Host / Join / Leave Session | Being the sending device / joining one by scanning its QR code / leaving |
| WATCH ONLY / Allow | A guest the host has not let work the light yet / the host letting it |
| PROVISIONAL | A placeholder fixture mode |
| GDTF | A file format for fixture definitions |